Get Started
Role Center
In order to use Latvian Base Localization, no specific role center is required, because the functionality can be accessed via search pane.
Configuration package import
Basic necessary system setup for the use of Latvian Base Localization is created, when applying the configuration package LVI.LVI.STANDARD.
- Click on the button Search for Page or Report...

- Type Config. Packages and select Config. Packages from Pages and Tasks
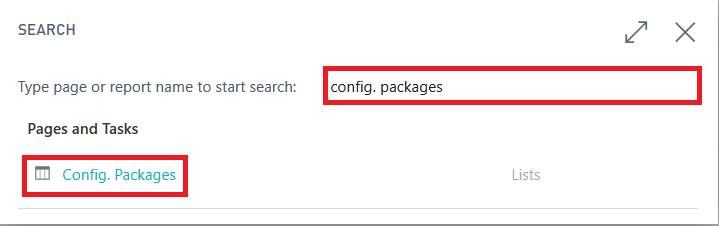
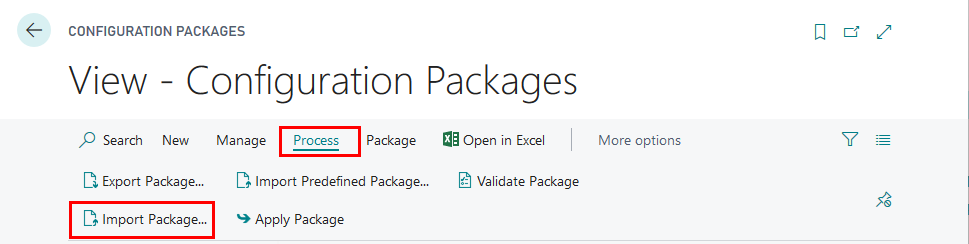
- Import Configuration Package LVI.LVI.STANDARD by pressing Import Package... in the Ribbon
Select the Config. Package LVI.LVI.Standard from your file system
Select LVI.LVI.STANDARD package from list of Config. Packages and press Apply Package.
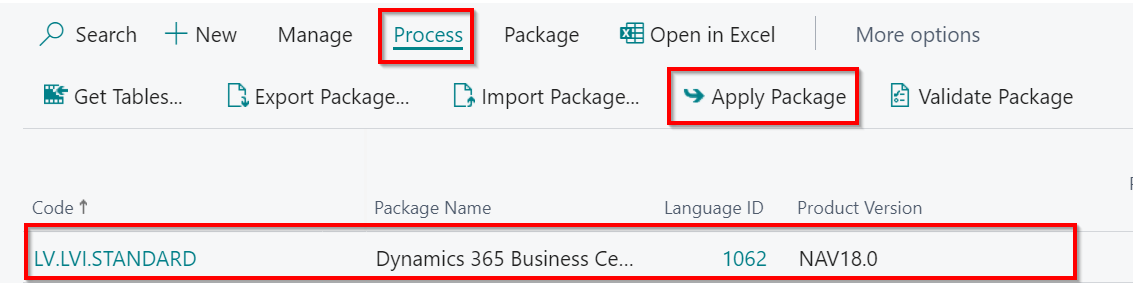
Configuration package ensures the following information:
- Countries/Regions and Country/Region Translations
- Currencies
- Customer, Vendor, Inventory, Bank Account, General Business, General Product, VAT Business, VAT Product Posting Groups
- General and VAT Posting Setup
- Shipment methods
- Source codes
- Post codes for Latvia
- Permissions sets
- Bank Export/Import Setup
- Foreign Payment codes
Permissions Sets
Use of Latvian Base Localization require the following permission sets to be assigned per user or user group:
- LV_TRANS_VIEW – designed for viewing list of Transporters and using them in documents
- LV_TRANS_EDIT- designed for creating, editing and deleting list of Transporters and using them in documents
- LV_FPC_VIEW- designed for viewing list of Foreign Payment Codes and using them in journals
- LV_FPC_EDIT- designed for creating, editing and deleting list of Foreign Payment Codes and using them in journals
Pre-requisites
The following information should be completed after importing configuration package:
- Click on the button Search for Page or Report...
 2. Type Employee and select Employees from Pages and Tasks
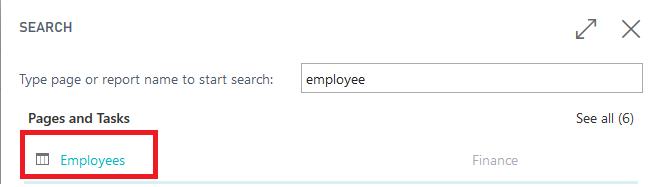 3. Create new employees who hold the following positions in the company:
a. General Manager
b. Finance Manager
c. Accounting Manager
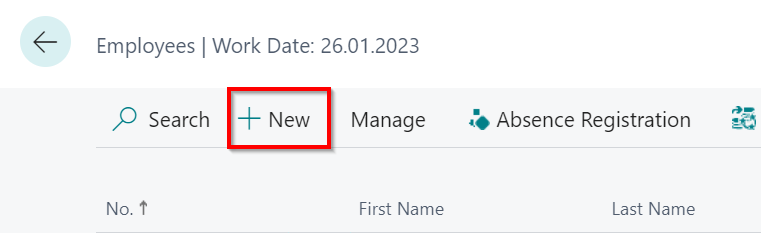
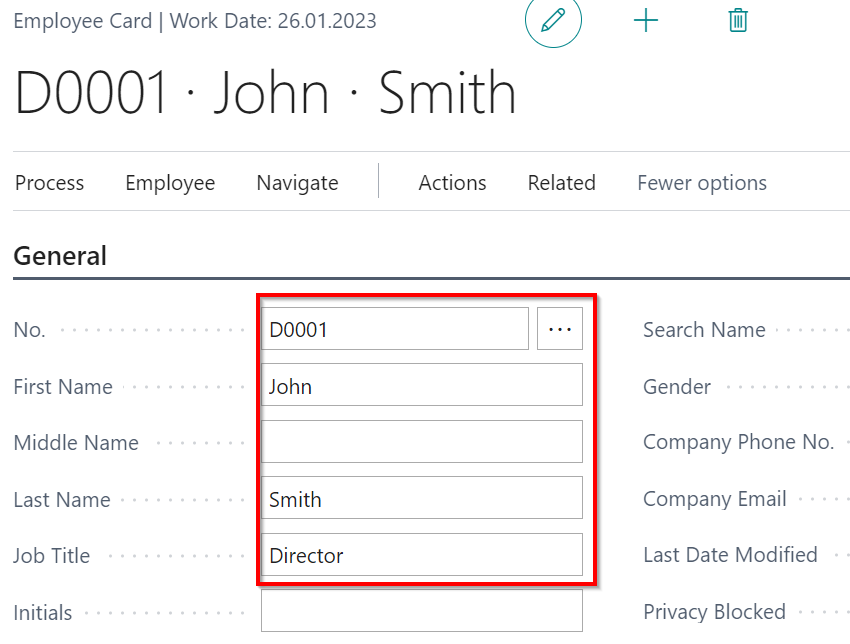
- Complete No., Name, Surname, Job Title fields
- Click on the button Search for Page or Report...

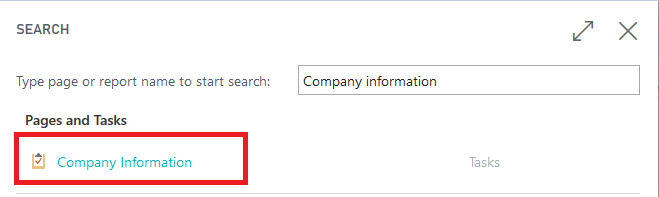
- Type Company Information and select Company Information from Pages and Tasks
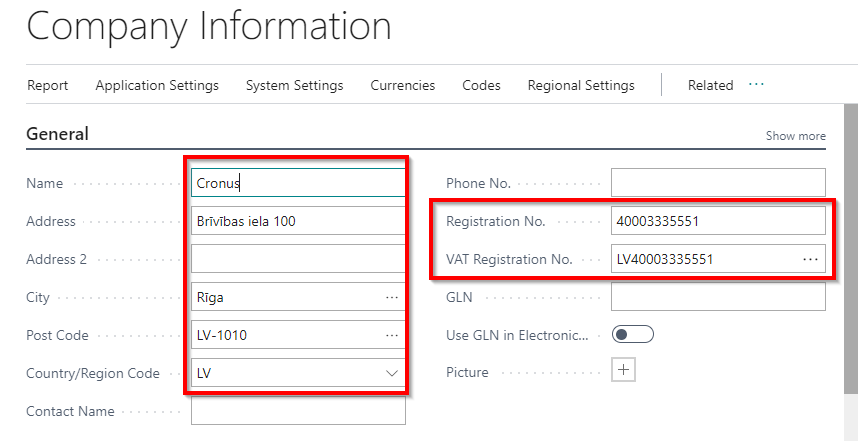
- Complete Company Information by:
a. Entering
i. Name
ii. Address
iii. Post Code
iv. Country
v. Registration No.
vi. VAT Registration No.
a. Selecting General Manager from List of Employees
b. Selecting Finance Manager from List of Employees
c. Selecting Accounting Manager from List of Employees
In case the Accounting Manager is not selected in Company Information, the in the printouts the Finance Manager data shall appear instead of Accounting Manager.
 8. Click on the button Search for Page or Report...

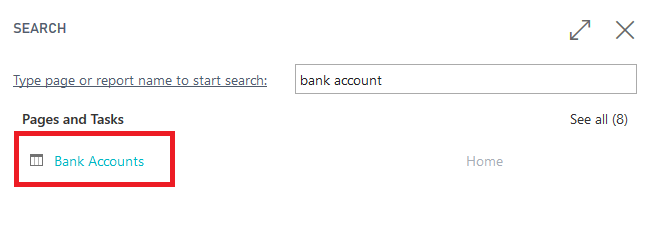
- Type Bank Account and select Bank Accounts from Pages and Tasks
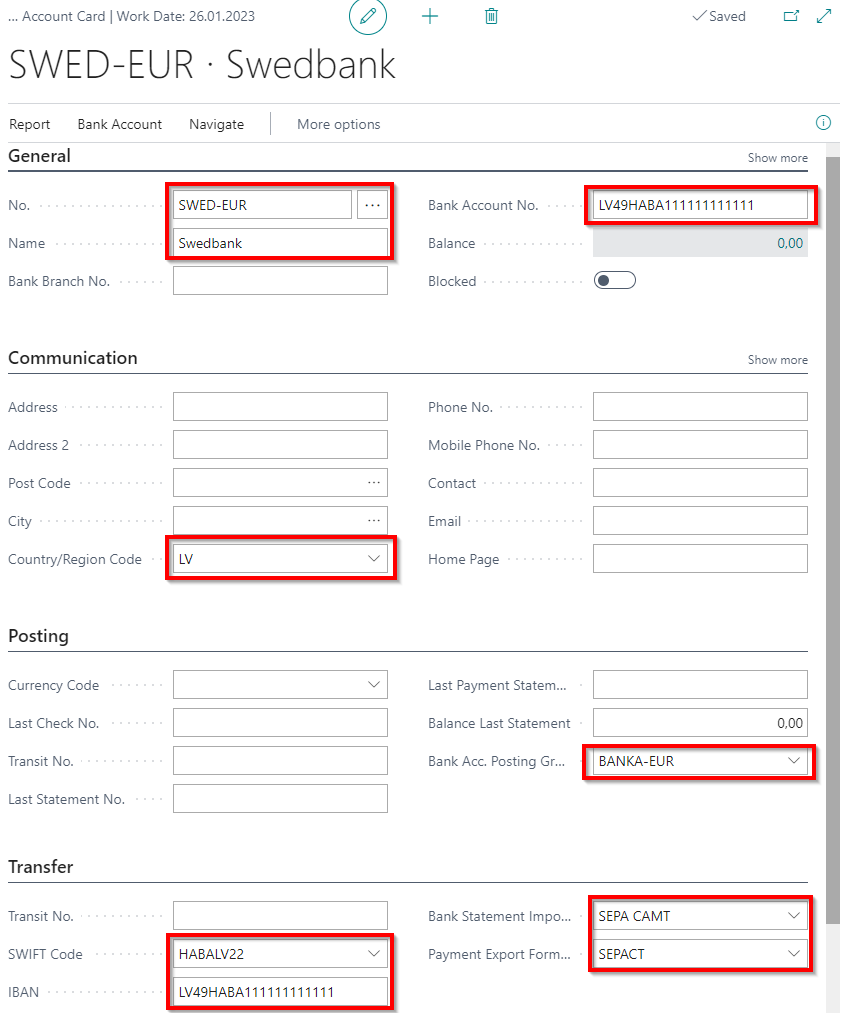
- Enter and complete Bank Account card information by entering:
a. Bank Name
b. Bank Account No.
c. Country Code
d. Currency Code
e. Bank Posting Group
f. Swift Code
g. IBAN
- Click on the button Search for Page or Report...

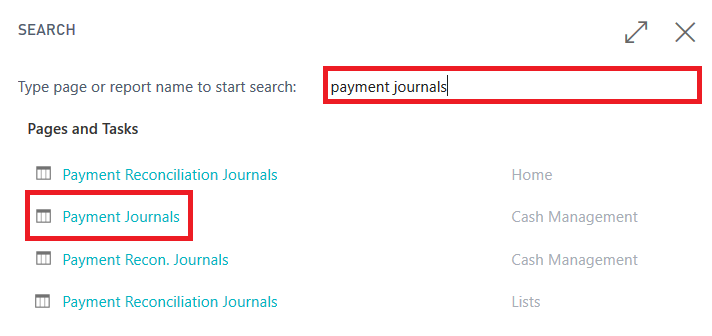
- Type Payment Journals and select Payment Journals from Pages and Tasks
- Complete Payment journal batch by:
a. Assigning Bank account as Balancing Account Type
b. Assigning Bank Account No. as Balancing Account No.

- Click on the button Search for Page or Report...

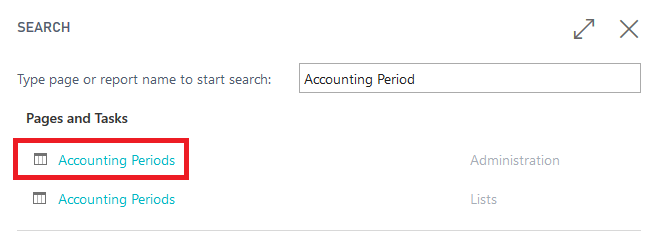
- Type Accounting Period and select Accounting Periods from Pages and Tasks
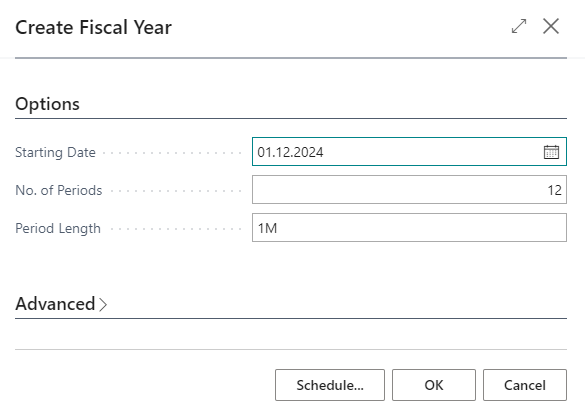
- Create New Financial Year in Accounting Periods

Setup
Transporters
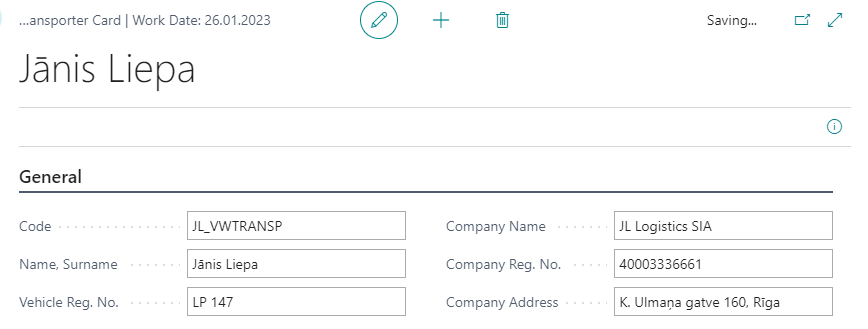
Each company may keep a list of transporters, where it includes vehicle and driver information for its own transport or external service provider transport. After creating Transporter cards, it is possible to use them in Sales, Purchase and Transfer document.
- Click on the button Search for Page or Report...

- Type Transporter and select Transporters from Pages and Tasks

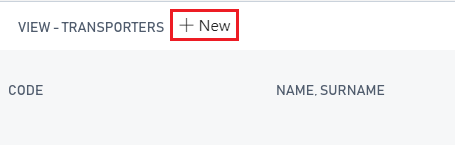
- Press New, in order to create New Transporter card
- The following information can be entered in the transporter card:
- Code - internal code for particular Transport Company
- Name, Surname - for Individual Service providers or particular Driver
- Vehicle Reg.No.- for vehicle registration number
- Company Name- for Corporate Service providers
- Company Reg. No.- registration ID for Corporate Delivery Service providers or personal ID for Individual Delivery Service providers
- Company address - legal address of the Delivery Service provider
Banks
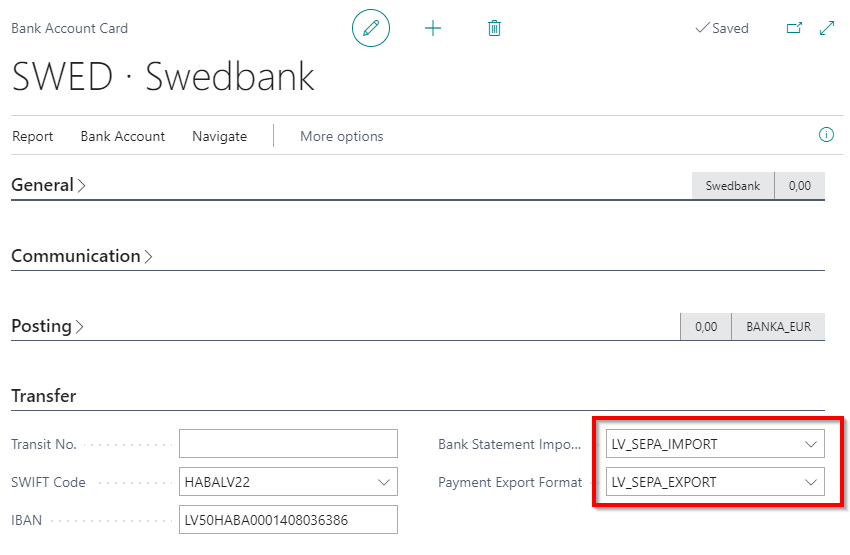
By applying LVI.LVI.STANDARD configuration package, the Bank Export/ Import Setup shall be modified by adding the particular payment export and bank statement import formats. The following information should be filled in Bank Account Card, in order to ensure successful payment file export and bank statement import:
- Payment Export Format- LV_SEPA_EXPORT
- Bank Statement Import Format- LV_SEPA_IMPORT
Foreign Payment Codes
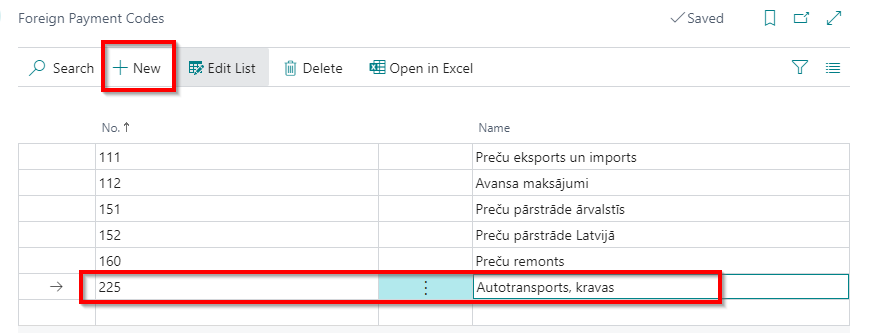
By applying LVI.LVI.Standard configuration package, the most often used incoming external payment code list shall be created and available for immediate use:
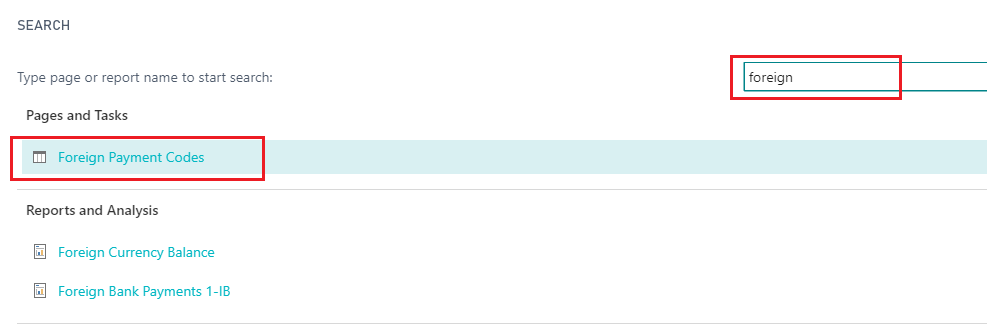
- Click on the button Search for Page or Report...

- Type Foreign Payment Codes and select Foreign Payment Codes from Pages and Tasks
- In case it is required create new additional codes for external incoming payments, press New in list of Foreign Payment codes and complete following fields:
- No.- define the number for the foreign payment code in accordance to Non-bank statistics report requirements
- Name - short description of the Foreign Payment Code
Currency Exchange Rate Import
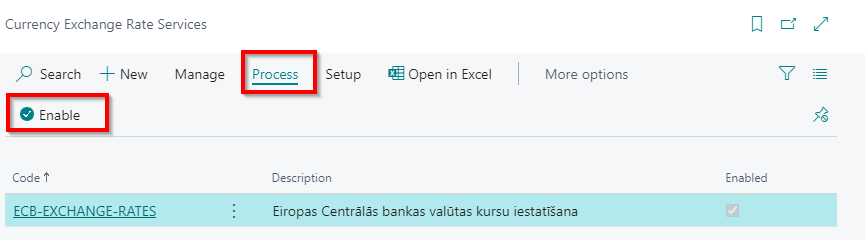
By applying LVI.LVI.Standard configuration package, Currency Exchange Rate Services are created in the system with all required setup and need to be enabled. In order to enable the Currency Exchange Rate Service proceed with following steps:
- Click on the button Search for Page or Report...

- Type Currency Exchange Rate Services and select Currency Exchange Rate Services from Pages and Tasks

- Select ECB-EXCHANGE-RATES from Currency Exchange Rate Services and press Process - Enable.
Document Printouts
Document printout does not require any additional setup and can be accessed from the following places:
- Sales Order
- Sales Invoice
- Sales Prepayment Invoice
- Posted Sales Invoice
- Sales Return Order
- Sales Credit Memo
- Posted Sales Credit Memo
- Transfer Order
- Posted Transfer Shipment
- Purchase Return Order
- Posted Purchase Credit Memo
- Customer Balance Reconciliation Document
- Vendor Balance Reconciliation Document
- Phys. Inventory Document
- Transfer Invoice
- Inventory Write-Off Document
- Posted Inventory Write-Off Document
- Fixed Asset Card
- Fixed Asset Commissioning Document
- Fixed Asset Phys. Inventory Document
- Fixed Asset Disposal Document
Advance statement report
By applying LVI.LVI.Standard configuration package, Vendor templates and Vendor Posting Groups are created in the system with all required setup. In order to setup advance holders proceed with following steps:
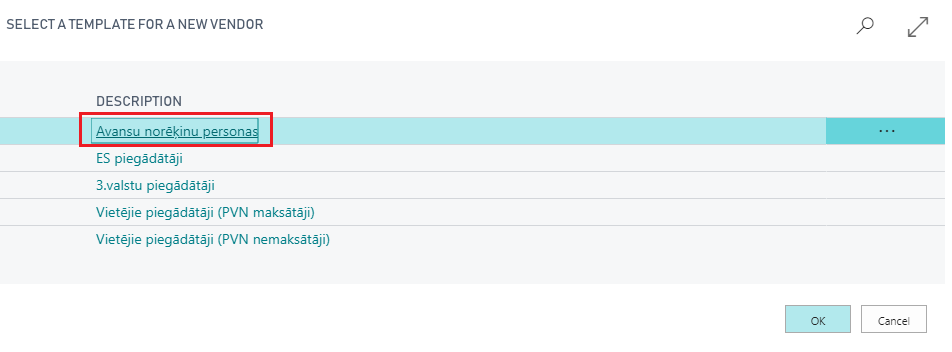
- Create New Vendor Card for an advance holder

- Use Vendor Templates to apply particular settings
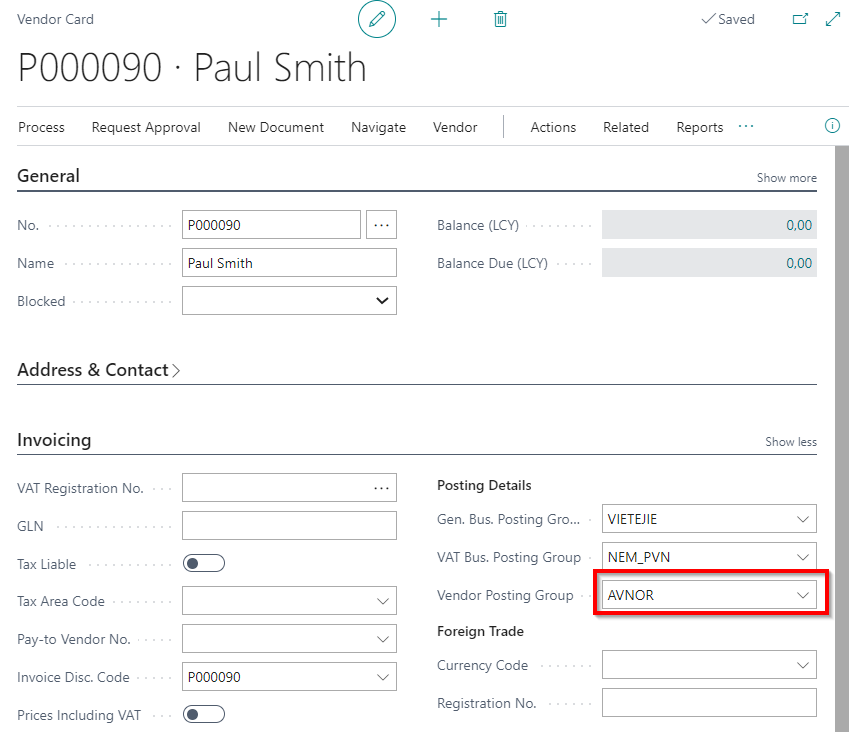
- Review that Vendor Posting Group is set to AVNOR that is used for particular advance holder
Use Personalization in order to make the field Posting Description available in Purchase Invoice, Purchase Credit Memo
If you need to use multiple posting groups, for example, to post advance payments separately from business trip expenses, you need to make changes to the settings.
5.1. Purchases & Payables Setup activate Allow Multiple Posting Groups option.
 5.2. Vendor Posting Groups create the missing Vendor Posting Group, and also take into account that each Vendor Posting Group has a different Payables Account (should be added to the Chart of Accounts).
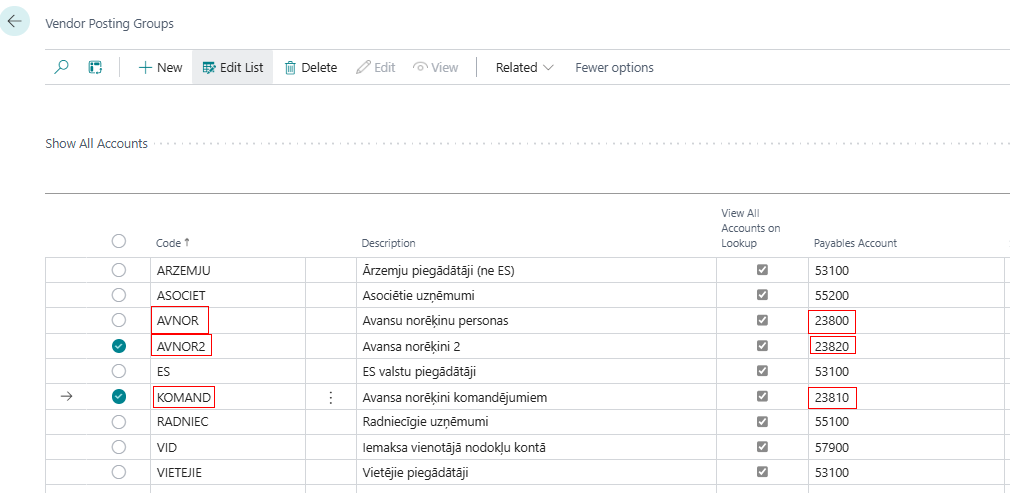 5.3. Alternative posting groups should be linked to each Advance Vendor posting group. Related -> Posting group -> Alternative groups.


How to use
How to use: Transporters in Documents
Transporter functionality ensures record keeping for list of transporters with their further use in shipment documents. It is possible to enter own vehicles and drivers, as well as external vehicles, drivers, mentioning the transporting company. Information about transporters is stored in posted documents. Transporters can be specified in the following documents under the fast tab Delivery:
- Sales Order
- Sales Invoice
- Transfer Order
- Purchase Return Order
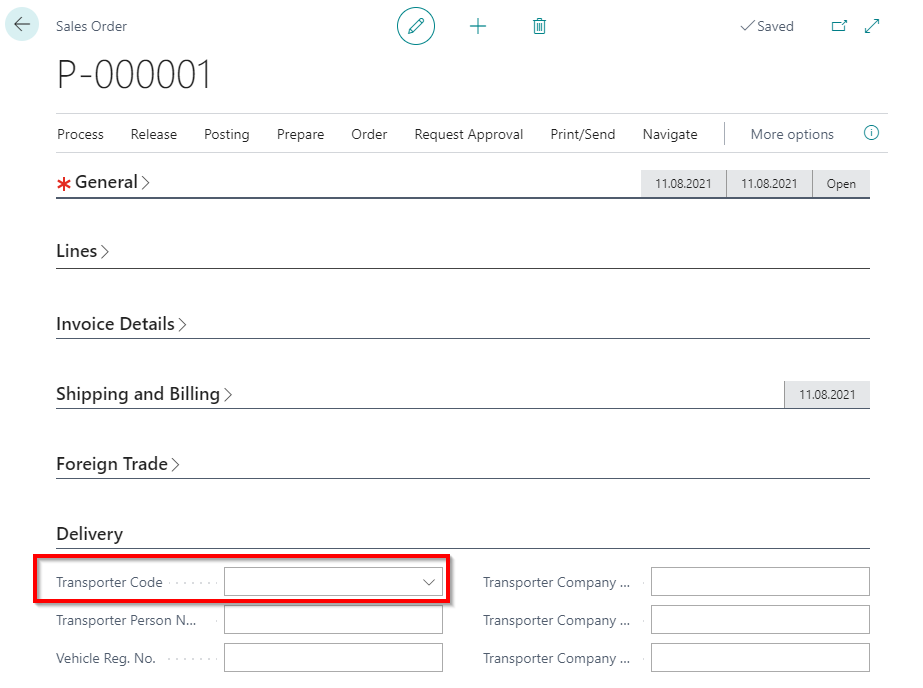
Transporter can be selected from the List of transporters in the documents mentioned above by completing Transporter Code. After Transporter Code is selected, the system populates Transporter Person Name, Vehicle Reg. No., Transporter Company Name, Transporter Company Reg. No., Transporter Company Address, that were entered in Transporter Card.
If Transporter Code is left blank, then it is possible to enter other fields in tab Delivery for the transporter information manually.
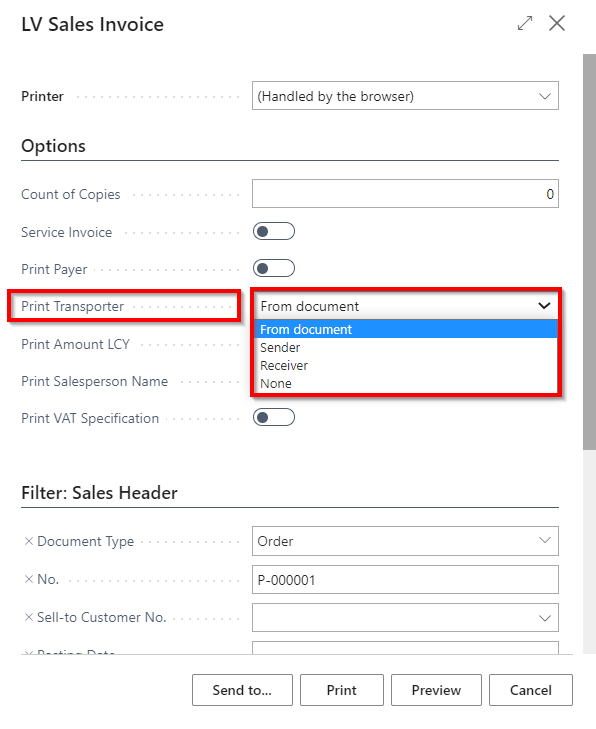
When LV Sales Invoice is printed, it is possible to choose whether to print out the transporter information from document either use sender information, or receiver information, or leave the transporter information blank.
After the documents have been posted, it is possible to see the Transporter information in:
- Posted Sales Shipment
- Posted Sales Invoice
- Posted Purchase Return Shipments
- Posted Purchase Credit Memo
- Posted Transfer Shipments
How to use: Banks
Bank functionality ensures:
- possibility to export payment files in ISO format that can be uploaded into Banking Online of commercial banks of Latvia
- possibility to upload bank statement files in ISO format into Business Central
Export Payment File.
Purpose: ensures possibility to export payment files in ISO format that can be uploaded into Banking Online of commercial banks of Latvia.
Availability: can be accessed from Payment Journal.
Pre-requisites: Payment journal batch should have a balancing account mentioned and Allow Payment Export checked.

In order to use the functionality, the following steps are required:
- Create payment lines in Payment Journal
- Press button Export.
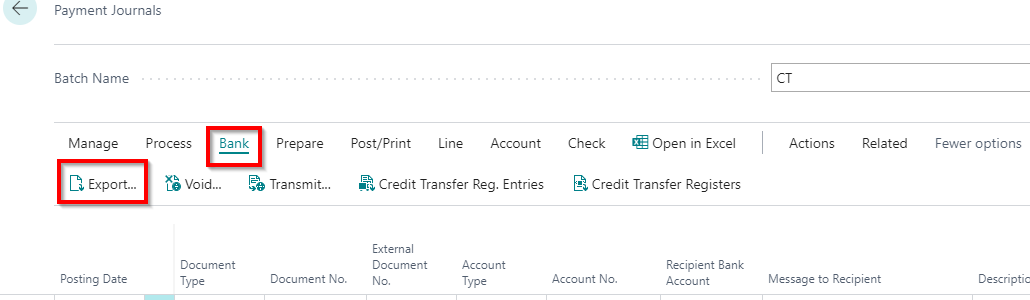
- Save file and upload it to Banking Online for your commercial bank in Latvia (for uploading steps, please require guidance of your specific commercial bank).
Import Bank Statement
Purpose: ensures possibility to upload bank statement files in ISO format into Business Central.
Availability: can be accessed from Payment Reconciliation Journal.
Pre-requisites: Bank Account Card should have Bank Account No. , IBAN, Bank Statement Import Format defined In order to use the functionality, the following steps are required:
- Click on the button Search for Page or Report...

- Type Payment Reconciliation Journals and select Payment Reconciliation Journals from Pages and Tasks
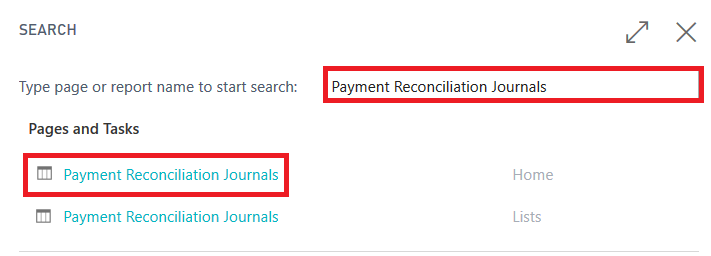
- Press Import Bank Transactions
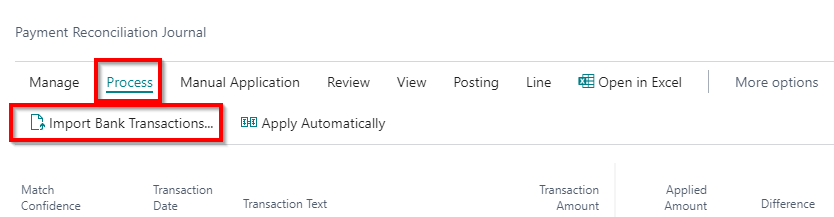
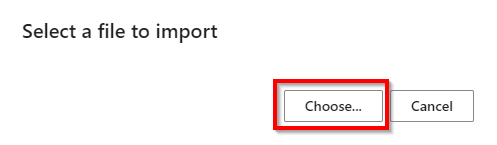
- Press Choose, in order to proceed with selecting the bank statement file for import
- Proceed with transaction application automatically or manually

- After all transactions are applied and accepted, proceed with posting payment reconciliation journal.
How to use: Foreign Payments
Assign Foreign Payment Code for transaction.
Purpose: National Bank of Latvia requires to specify foreign payment code for external incoming payments. When posting external incoming payments, a Foreign Payment Code needs to be assigned to particular transaction. Afterwards a Foreign Payment Report can be created.
Availability: can be accessed from Payment Journal, Payment Reconciliation Journal.
Pre-requisites: List of Foreign Payment needs to be completed. In order to use the functionality, the following steps are required:
- Click on the button Search for Page or Report...

- Type Payment Journals and select Payment Journals from Pages and Tasks
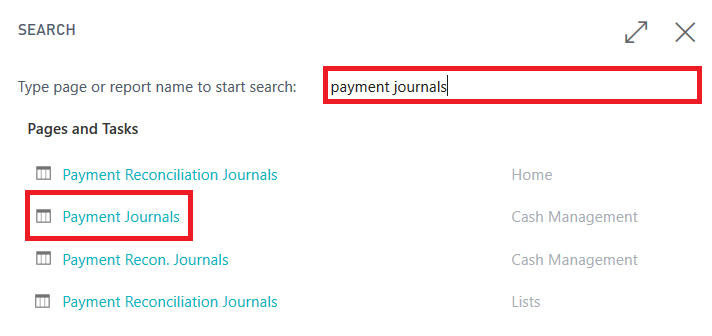
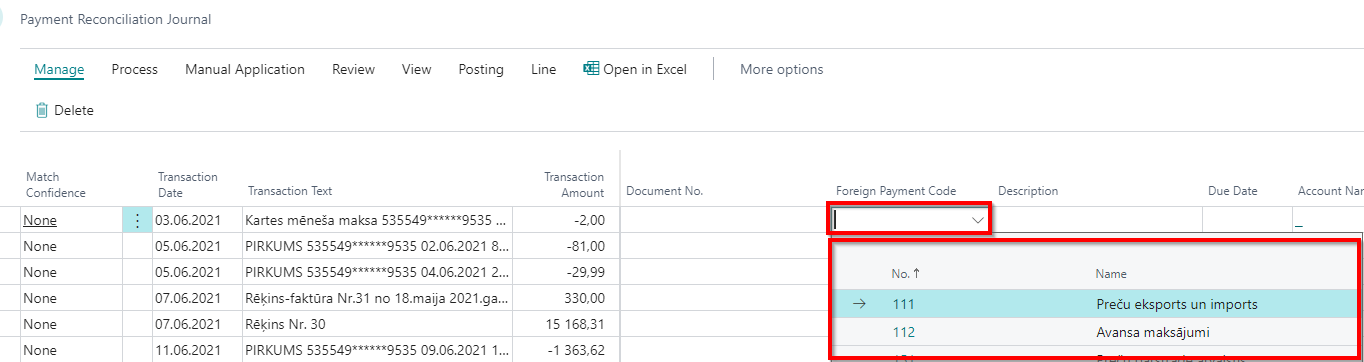
- Create a Payment journal line with an incoming payment from a foreign Customer, assign Foreign Payment Code before posting
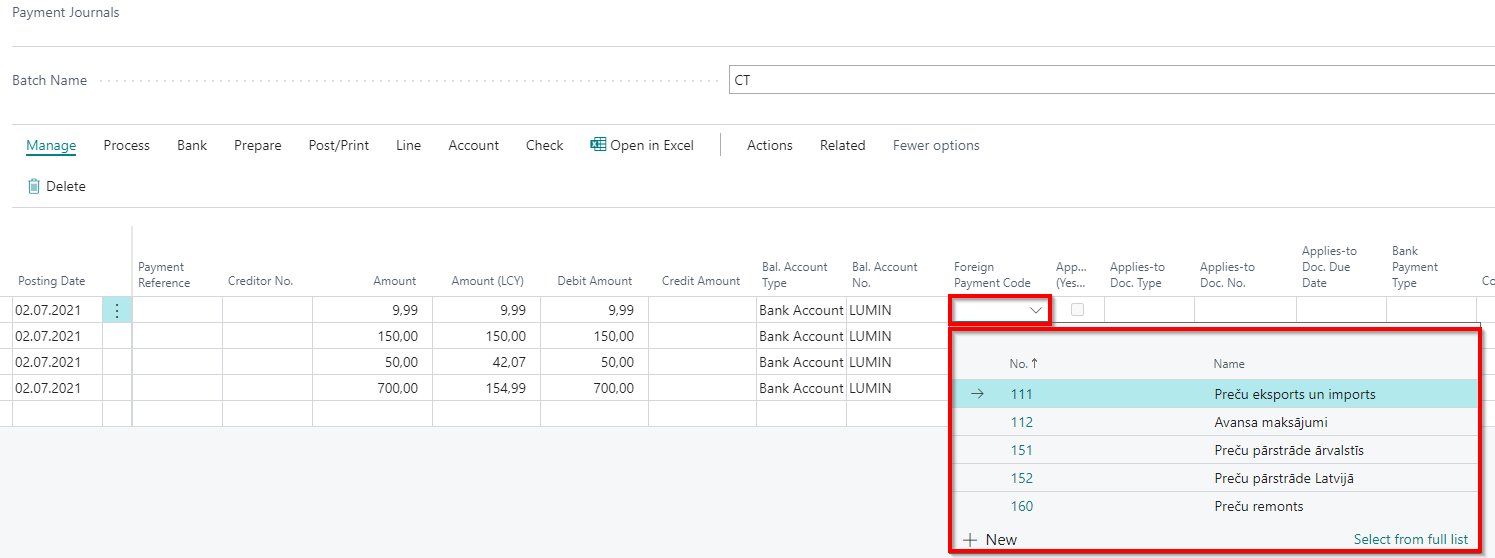
The same steps apply to the use of Foreign Payment Code in Payment Reconciliation Journal. Import bank transactions in Payment Reconciliation journal line with an incoming payment from a foreign Customer, assign Foreign Payment Code before posting.
Prepare Report Foreign Bank Payments 1-IB
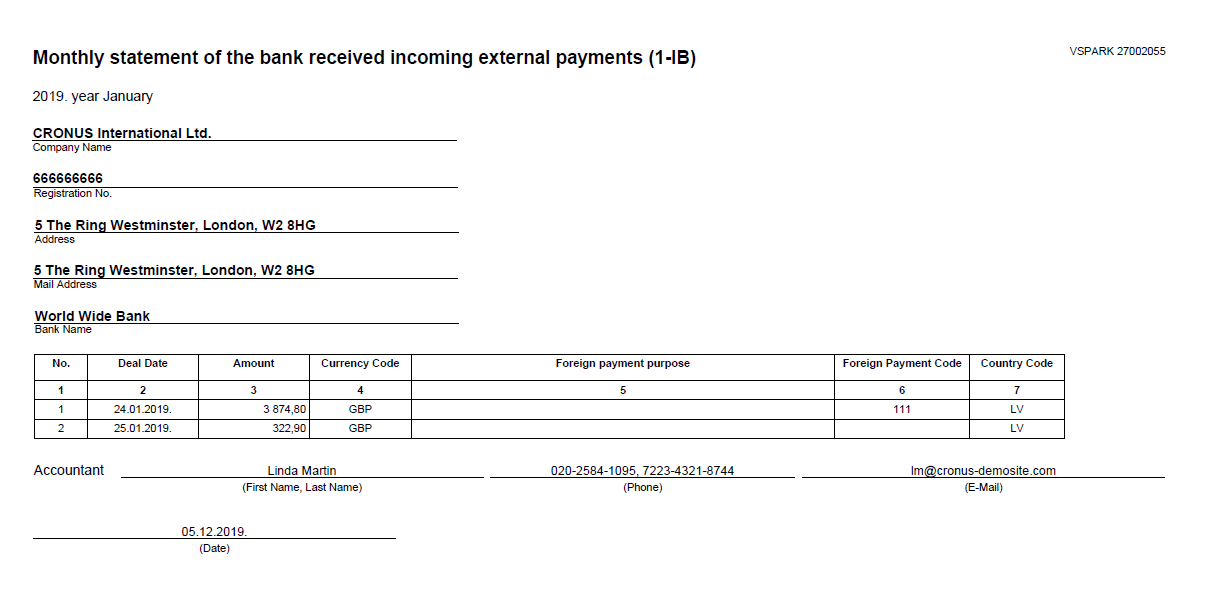
Purpose: Foreign Bank Payments 1-IB is used, in order to prepare information for National Bank of Latvia on incoming external payments on a monthly basis.
Availability: can be accessed from Search for Page or Report…
Pre-requisites: List of Foreign Payment needs to be completed; Foreign Payment Codes needs to be assigned per transaction before it is posted In order to use the functionality, the following steps are required:
- Click on the button Search for Page or Report...

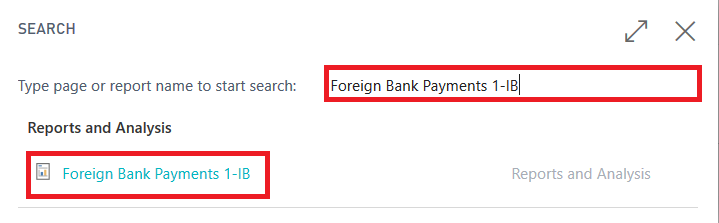
- Type Foreign Bank Payments 1-IB and select Foreign Bank Payments 1-IB from Reports and Analysis
- Define Printing Options
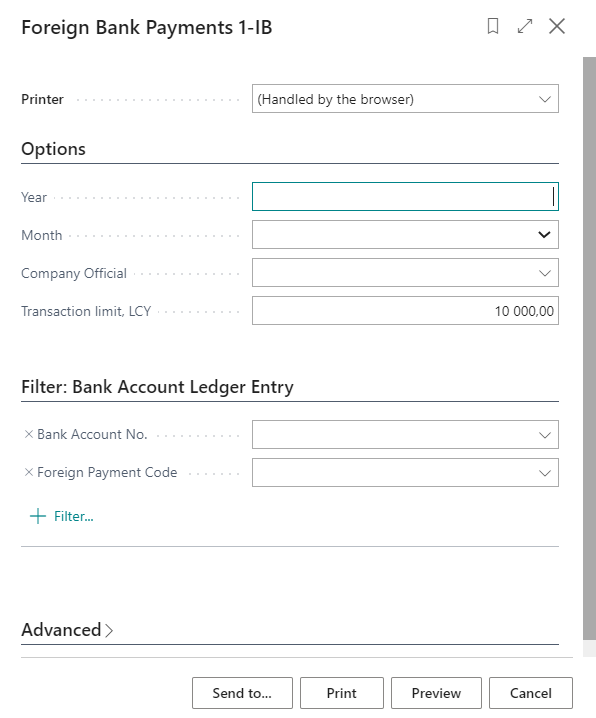
Printing Options:
- Year – define year of the report as YYYY
- Month – select month for the report from a drop-down list
- Company Official – select an employee from the List of Employees, who shall be defined in the report as preparer
- Transaction Limit, LCY – set the transaction limit for external incoming payments based on current legislation requirements; all transactions above the limit shall be included in the report Also a filter on bank ledger entries can be applied, when creating the report
How to use: Currency Exchange Rate Import
Purpose: transactions in foreign currencies are recorded in the system in local currency, based on currency exchange rate. Currency Exchange Rates may be uploaded into system either automatically on a regular basis using a job que entry or manually by user. The source of information is European Central Bank (http://www.ecb.int/stats/exchange/eurofxref/html/index.en.html) The functionality ensures currency exchange rate import for all currency codes for a period of 90 days, for which European Central Bank provides the exchange rate. Other currency exchanges rates for currencies not publish by European Central bank may be entered manually.
Availability: can be accessed from List of Currencies.
Pre-requisites: Currency cards need to be completed with currency code and related standard setup. In order to use the functionality manually, the following steps are required:
- Click on the button Search for Page or Report...

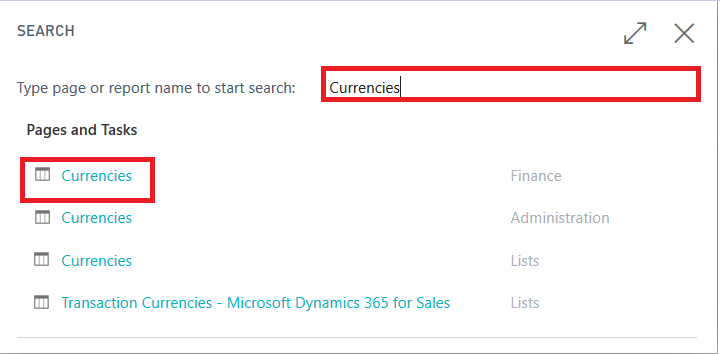
- Type Currencies and select Currencies from Pages and Tasks
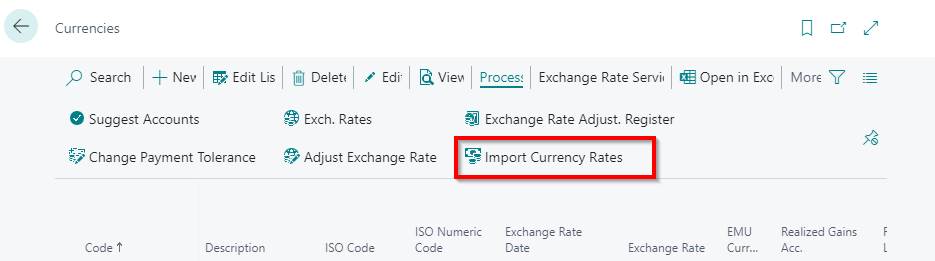
- Press Import Currency Rates
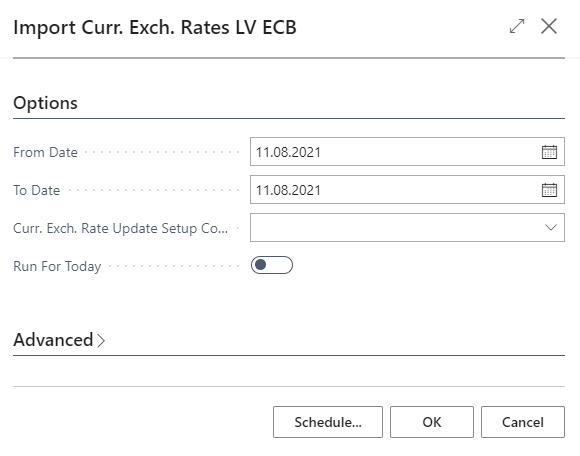
- Define Import Currency Rates options
Options:
- From Date – set the period start date for import
- To Date – set the period end date for import (by default is set to today)
- Curr.Exch. Rate Update Setup – select the setup code, that was uploaded in the system by LVI.LVI.Standard configuration package ECB-EXCHANGE-RATES
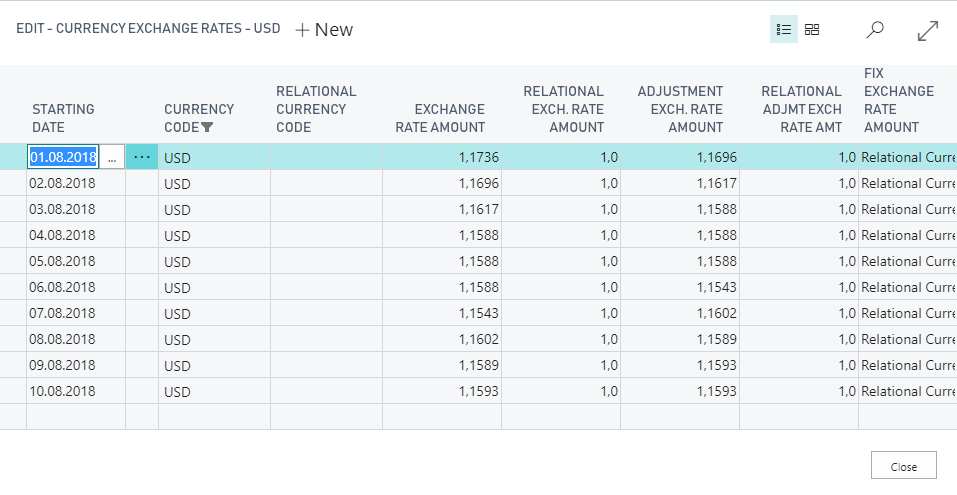
Note: European Central bank publishes currency exchange rates for the day at 15:15 each working day. All foreign currency accounting transactions should be recorded, using currency exchange rate, that is available at the beginning of the current day (published the previous day)- Exchange Rate Amount. If currency exchange rate for current date is available (after 15:15), then the value is displayed in field Adjustment Currency Exchange Rate Amount. Currency reevaluation is done based on Adjustment Currency Exchange Rate Amount at the end of the period. Foreign currency exchange rate amounts are calculated as amount of foreign currency per 1 EUR (1.00 EUR = 1.3317 USD).
How to use: Document Printouts
LV Base and Invoice ensures possibility to create the following printouts in Dynamics 365 Business Central that are compliant with Latvia local legislation requirements:
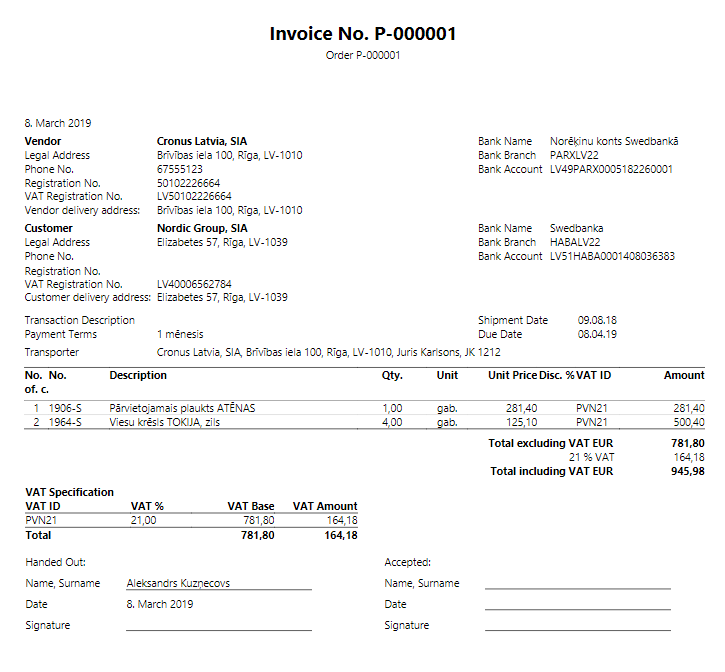
- LV Sales Invoice from unposted sales documents- Sales Order, Sales Invoice
- LV Sales Prepayment Invoice from unposted sales documents- Sales Order
- LV Sales Invoice from posted sales documents- Posted Sales Invoice
- LV Sales Cr. Memo from unposted sales return documents- Sales Return Order, Sales Credit Memo
- LV Sales Cr. Memo from posted sales return documents – Posted Sales Credit Memo
- LV Purchase Cr. Memo from unposted purchase return documents – Purchase Return Order, Purchase Credit Memo
- LV Purchase Cr. Memo from posted purchase return documents – Posted Purchase Credit Memo It is recommended to create printouts mentioned above from Posted documents.
Sales Invoice
Purpose: is prepared for customers for goods shipped or services provided as sales source document. The printout has required data, in order to be treated as source document, procurement document (confirming delivery of goods), service invoice, VAT invoice.
Available for printing from: document can be printed from unposted sales documents- Sales Order, Sales Invoice; from posted sales documents- Posted Sales Invoice.
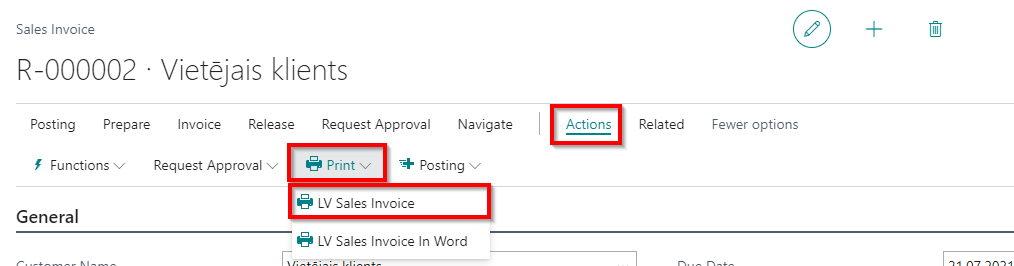
Pre-requisites: Sales Order and Sales Invoice should be in status Released; no pre-requisites for Posted Sales Invoice.
Printing Options: the following printing options are available for this printout:
- Count of Copies – determine how many additional copies should be printed together with original document; any integer can be entered
- Service invoice – if checked, then the printout omits information related to delivery of goods (Vendor Delivery Address, Customer Delivery Address), transporter information and has no signature line for the Customer
- Print Payer – if checked, then the printout prints the Payer information (Bill-To Customer) in the header of the document below the Customer information. Applies if only the Bill-To Customer differs from Sell-To Customer
- Print Transporter - choose whether to print out the transporter information from document either use sender information, or receiver information, or leave the transporter information blank (None)
- Print Amount in LCY – used for documents in foreign currency, if checked, then additional section is printed (Total excluding VAT, VAT%, Total including VAT) in local currency of the company
- Print Salesperson Name – if checked, then Salesperson name is printed in the signatory part of the invoice; salesperson code should be filled in the document
- Print VAT Specification – if checked, then VAT specification is printed (VAT ID, VAT%, VAT Base, VAT Amount) in currency of the document
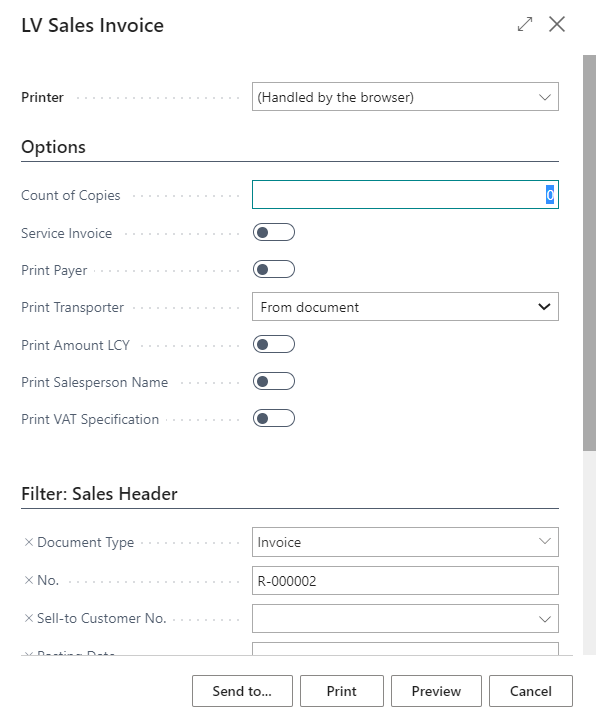
When the printing options are selected, it is possible to use standard Send To…, Print, Preview functions.
Sales Prepayment Invoice
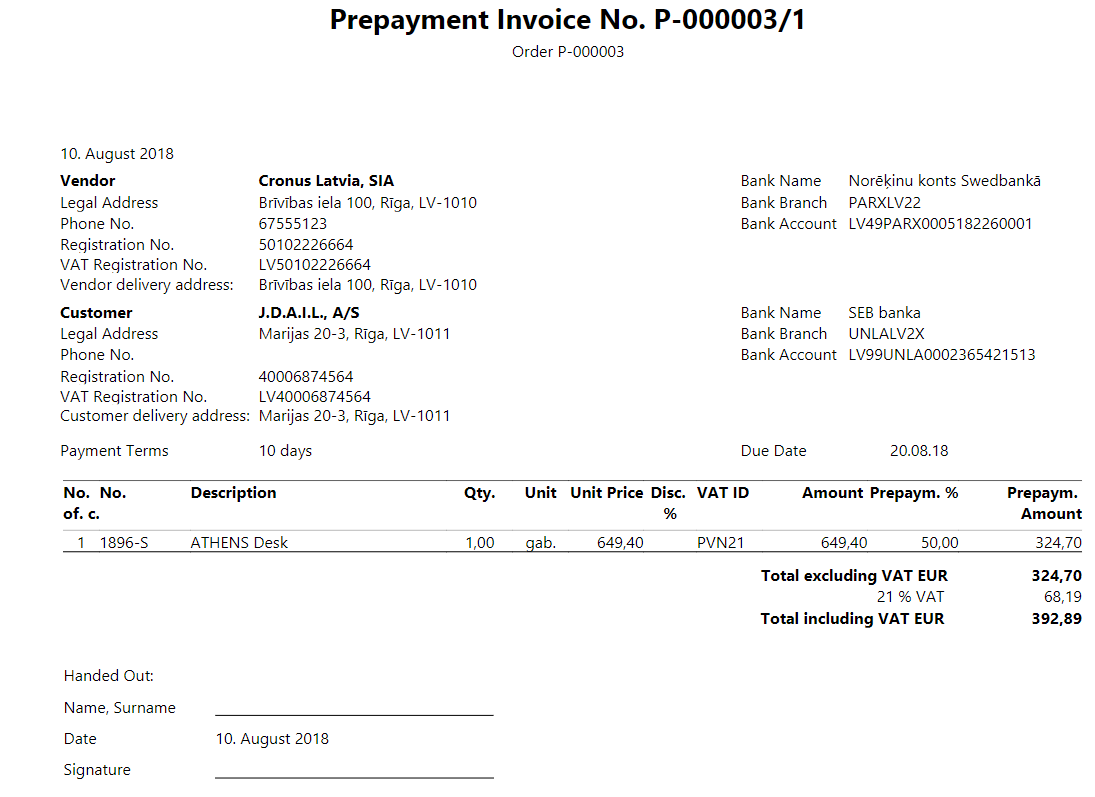
Purpose: is prepared for customers as a sales prepayment invoice for goods not yet shipped or services not yet provided as sales source document. The printout has all required data for sales prepayment document.
Available for printing from: document can be printed from unposted sales documents- Sales Order.
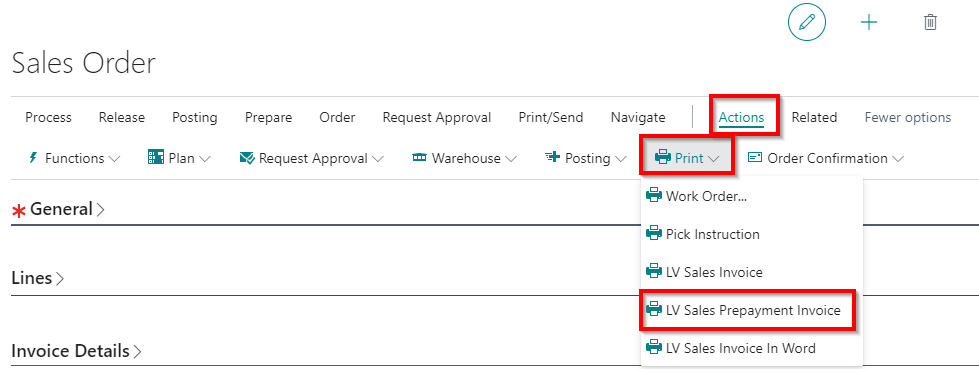
Pre-requisites:
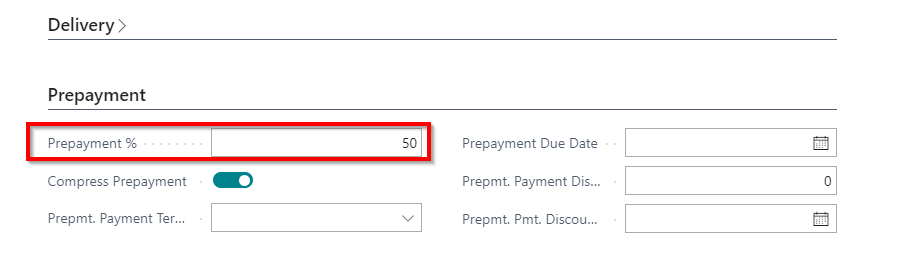
Prepayment % should be completed in Sales Order or Sales Order Lines.
LV Sales Prepayment Invoice should be printed before posting Prepayment Invoice.
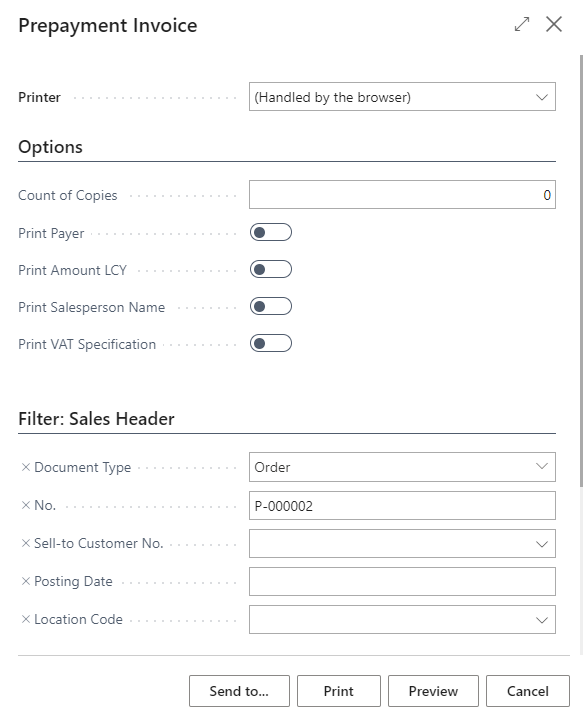
Printing Options: the following printing options are available for this printout:
- Count of Copies – determine how many additional copies should be printed together with original document; any integer can be entered
- Print Payer – if checked, then the printout prints the Payer information (Bill-To Customer) in the header of the document below the Customer information. Applies if only the Bill-To Customer differs from Sell-To Customer
- Print Amount in LCY – used for documents in foreign currency, if checked, then additional section is printed (Total excluding VAT, VAT%, Total including VAT) in local currency of the company
- Print Salesperson Name – if checked, then Salesperson name is printed in the signatory part of the invoice; salesperson code should be filled in the document
- Print VAT Specification – if checked, then VAT specification is printed (VAT ID, VAT%, VAT Base, VAT Amount) in currency of the document
Sales Credit Memo
Purpose: is prepared for customers for goods returned or services cancelled as sales return source document. The printout has required data, in order to be treated as source document, procurement document (confirming delivery of goods), service invoice, VAT invoice.
Available for printing from: unposted sales return documents- Sales Return Order, Sales Credit Memo; posted sales return documents – Posted Sales Credit Memo.

Pre-requisites: Sales Return Order and Sales Credit Memo should be in status Released; no pre-requisites for Posted Sales Credit Memo.
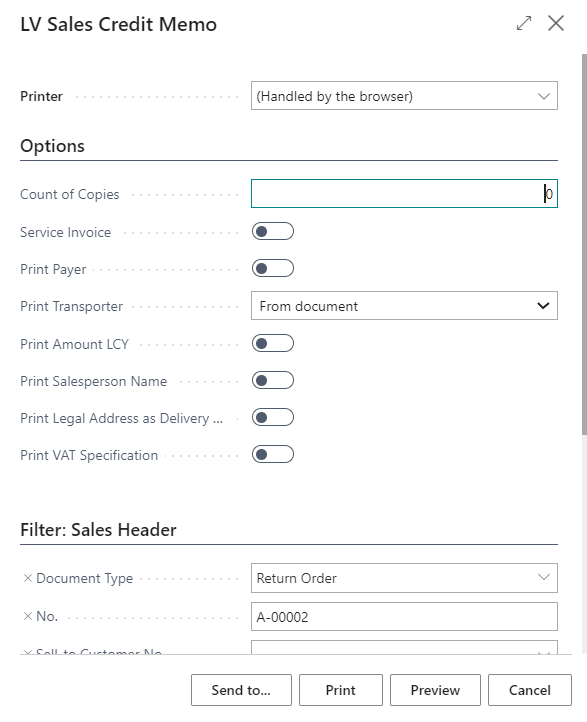
Printing Options:
- Count of Copies – determine how many additional copies should be printed together with original document; any integer can be entered
- Service invoice – if checked, then the printout omits information related to delivery of goods (Vendor Delivery Address, Customer Delivery Address), transporter information and has no signature line for the Customer
- Print Payer – if checked, then the printout prints the Payer information (Bill-To Customer) in the header of the document below the Customer information. Applies if only the Bill-To Customer differs from Sell-To Customer
- Print Transporter - choose whether to print out the transporter information from document either use sender information, or receiver information, or leave the transporter information blank (None)
- Print Amount in LCY – used for documents in foreign currency, if checked, then additional section is printed (Total excluding VAT, VAT%, Total including VAT) in local currency of the company
- Print Salesperson Name – if checked, then Salesperson name is printed in the signatory part of the invoice; salesperson code should be filled in the document
- Print Legal Address as Delivery Address – if checked, then legal address is printed instead of delivery address for Customer who is returning the goods
- Print VAT Specification – if checked, then VAT specification is printed (VAT ID, VAT%, VAT Base, VAT Amount) in currency of the document
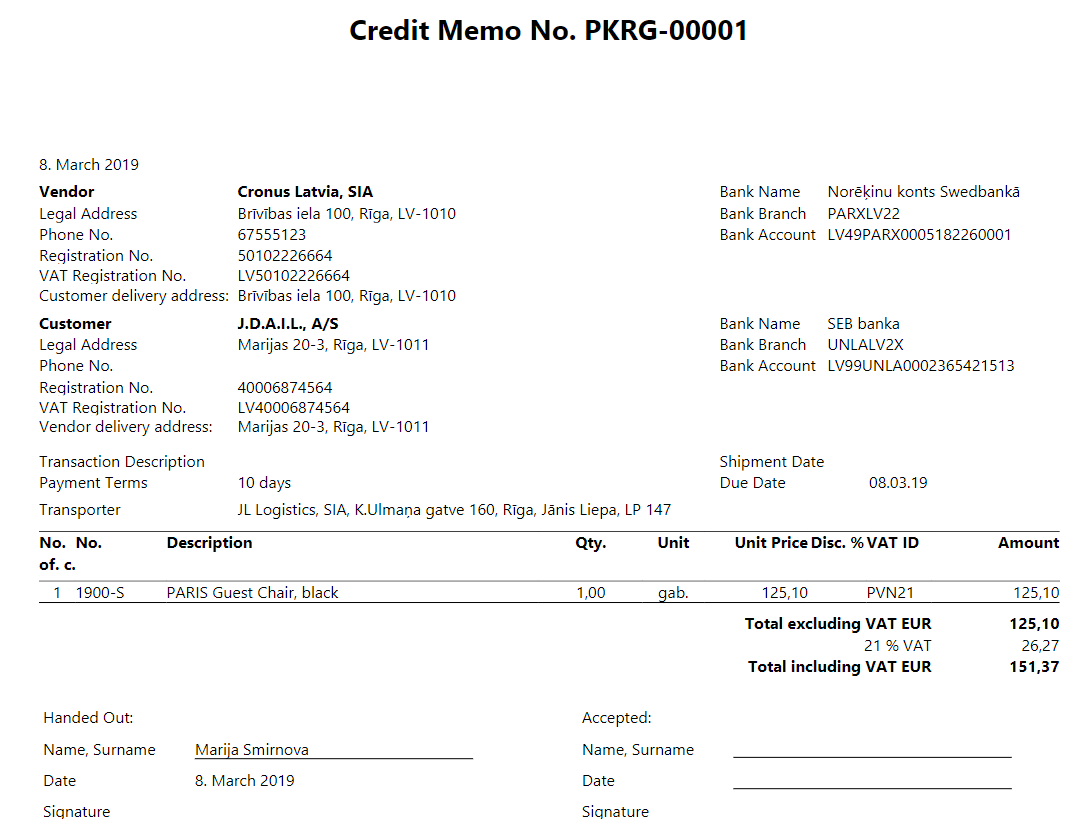
Purchase Credit Memo
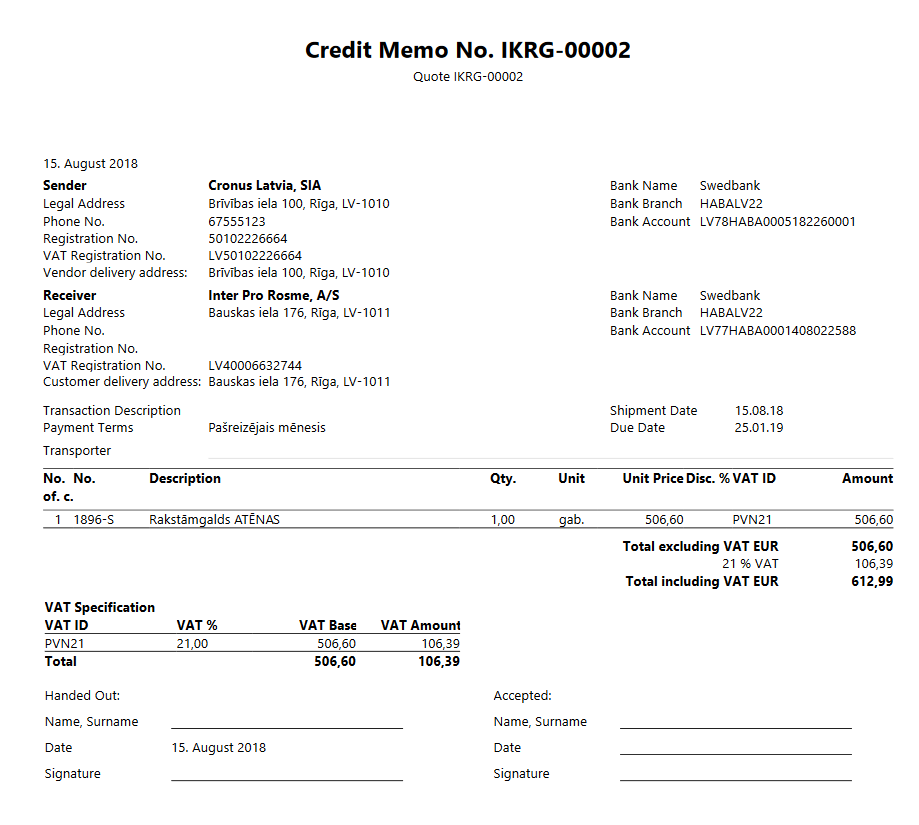
Purpose: is prepared for vendors to whom the goods are returned. The printout has required data, in order to be treated as source document, procurement document (confirming delivery of goods), service invoice, VAT invoice.
Available for printing from: unposted purchase return documents – Purchase Return Order, Purchase Credit Memo; posted purchase return documents – Posted Purchase Credit Memo.
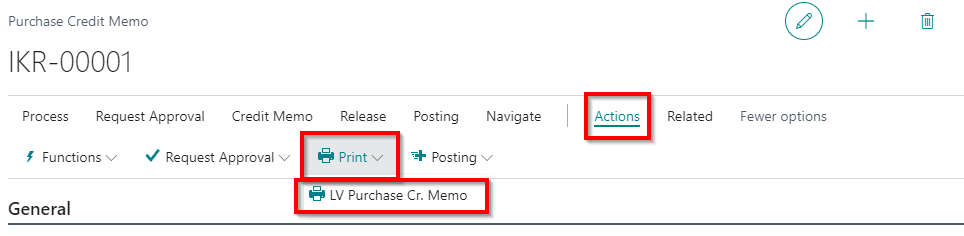
Pre-requisites: Purchase Return Order and Purchase Credit Memo should be in status Released; no pre-requisites for Posted Purchase Credit Memo.
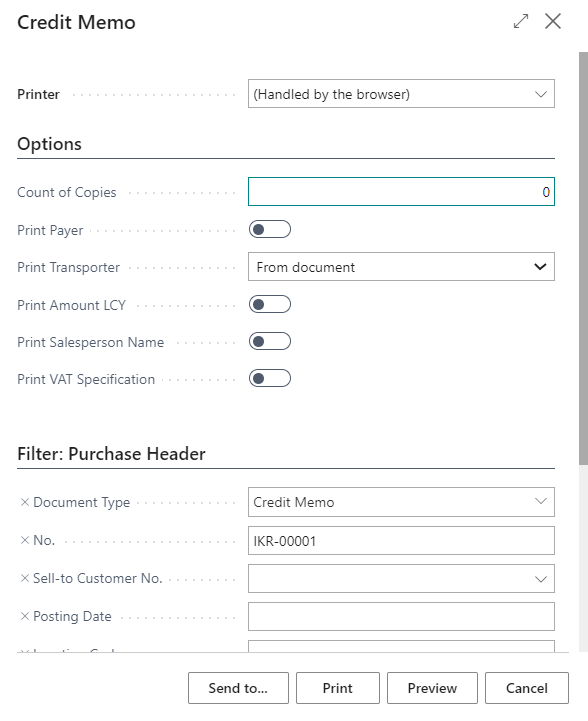
Printing Options:
- Count of Copies – determine how many additional copies should be printed together with original document; any integer can be entered
- Print Payer – if checked, then the printout prints the Payer information (Pay-To Vendor) in the header of the document below the Vendor information. Applies if only the Pay-To Vendor differs from Buy-from Vendor
- Print Transporter - choose whether to print out the transporter information from document either use sender information, or receiver information, or leave the transporter information blank (None)
- Print Amount in LCY – used for documents in foreign currency, if checked, then additional section is printed (Total excluding VAT, VAT%, Total including VAT) in local currency of the company
- Print Salesperson Name – if checked, then Salesperson name is printed in the signatory part of the invoice; salesperson code should be filled in the document
- Print VAT Specification – if checked, then VAT specification is printed (VAT ID, VAT%, VAT Base, VAT Amount) in currency of the document
Transfer Invoice
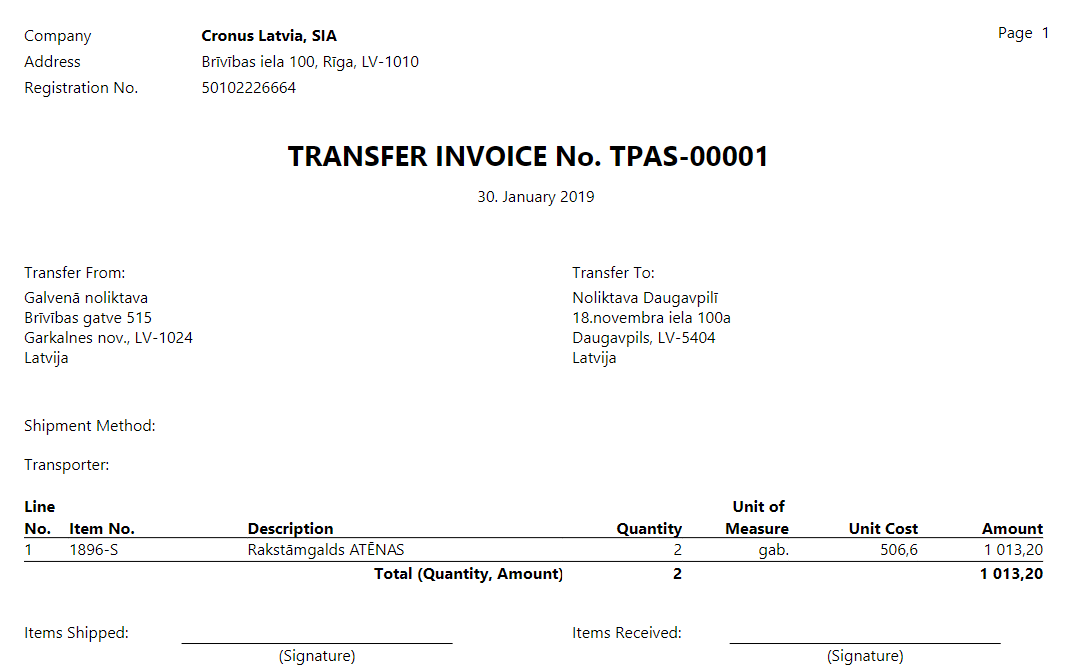
Purpose: Transfer of goods is required to be supported by a delivery note – transfer invoice. The document indicates the quantity and unit costs of goods transferred.
Availability: can be accessed from Transfer Order, Posted Transfer Shipment.

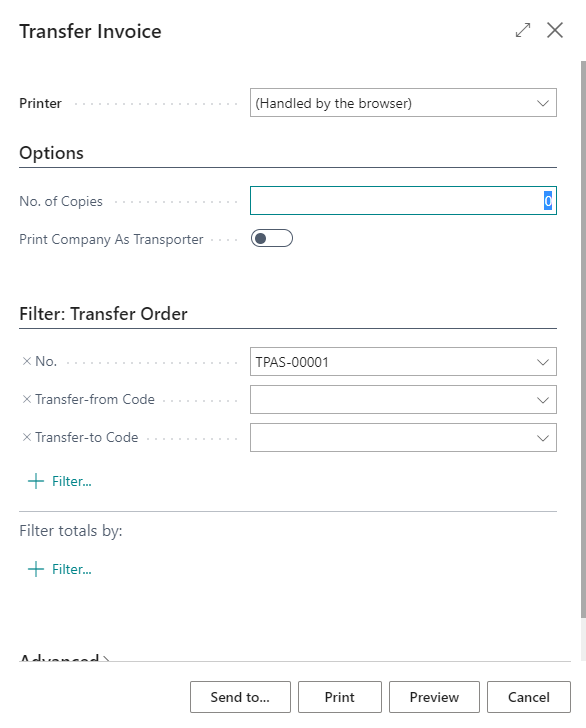
Printing Options: the following printing options are available for this printout:
- No. of Copies – determine how many additional copies should be printed together
- Print Company as Transporter – if checked, then Company details are inserted in Transporter information in the printout
How to use: Advance holders
Purpose: An advance holder is an employee of a company who is accountable for an expense amount that is provided by the organization. Advance holders are created as Vendors with particular Vendor Posting Group.
Post Advance Holder Transactions. Advance holder transactions are the procurements made by the Employee, that are considered as company expenses. When a procurement happens, an advance holder reports to the company about the expenditures that were made.
Advance holder transactions can be recorded in 2 ways:
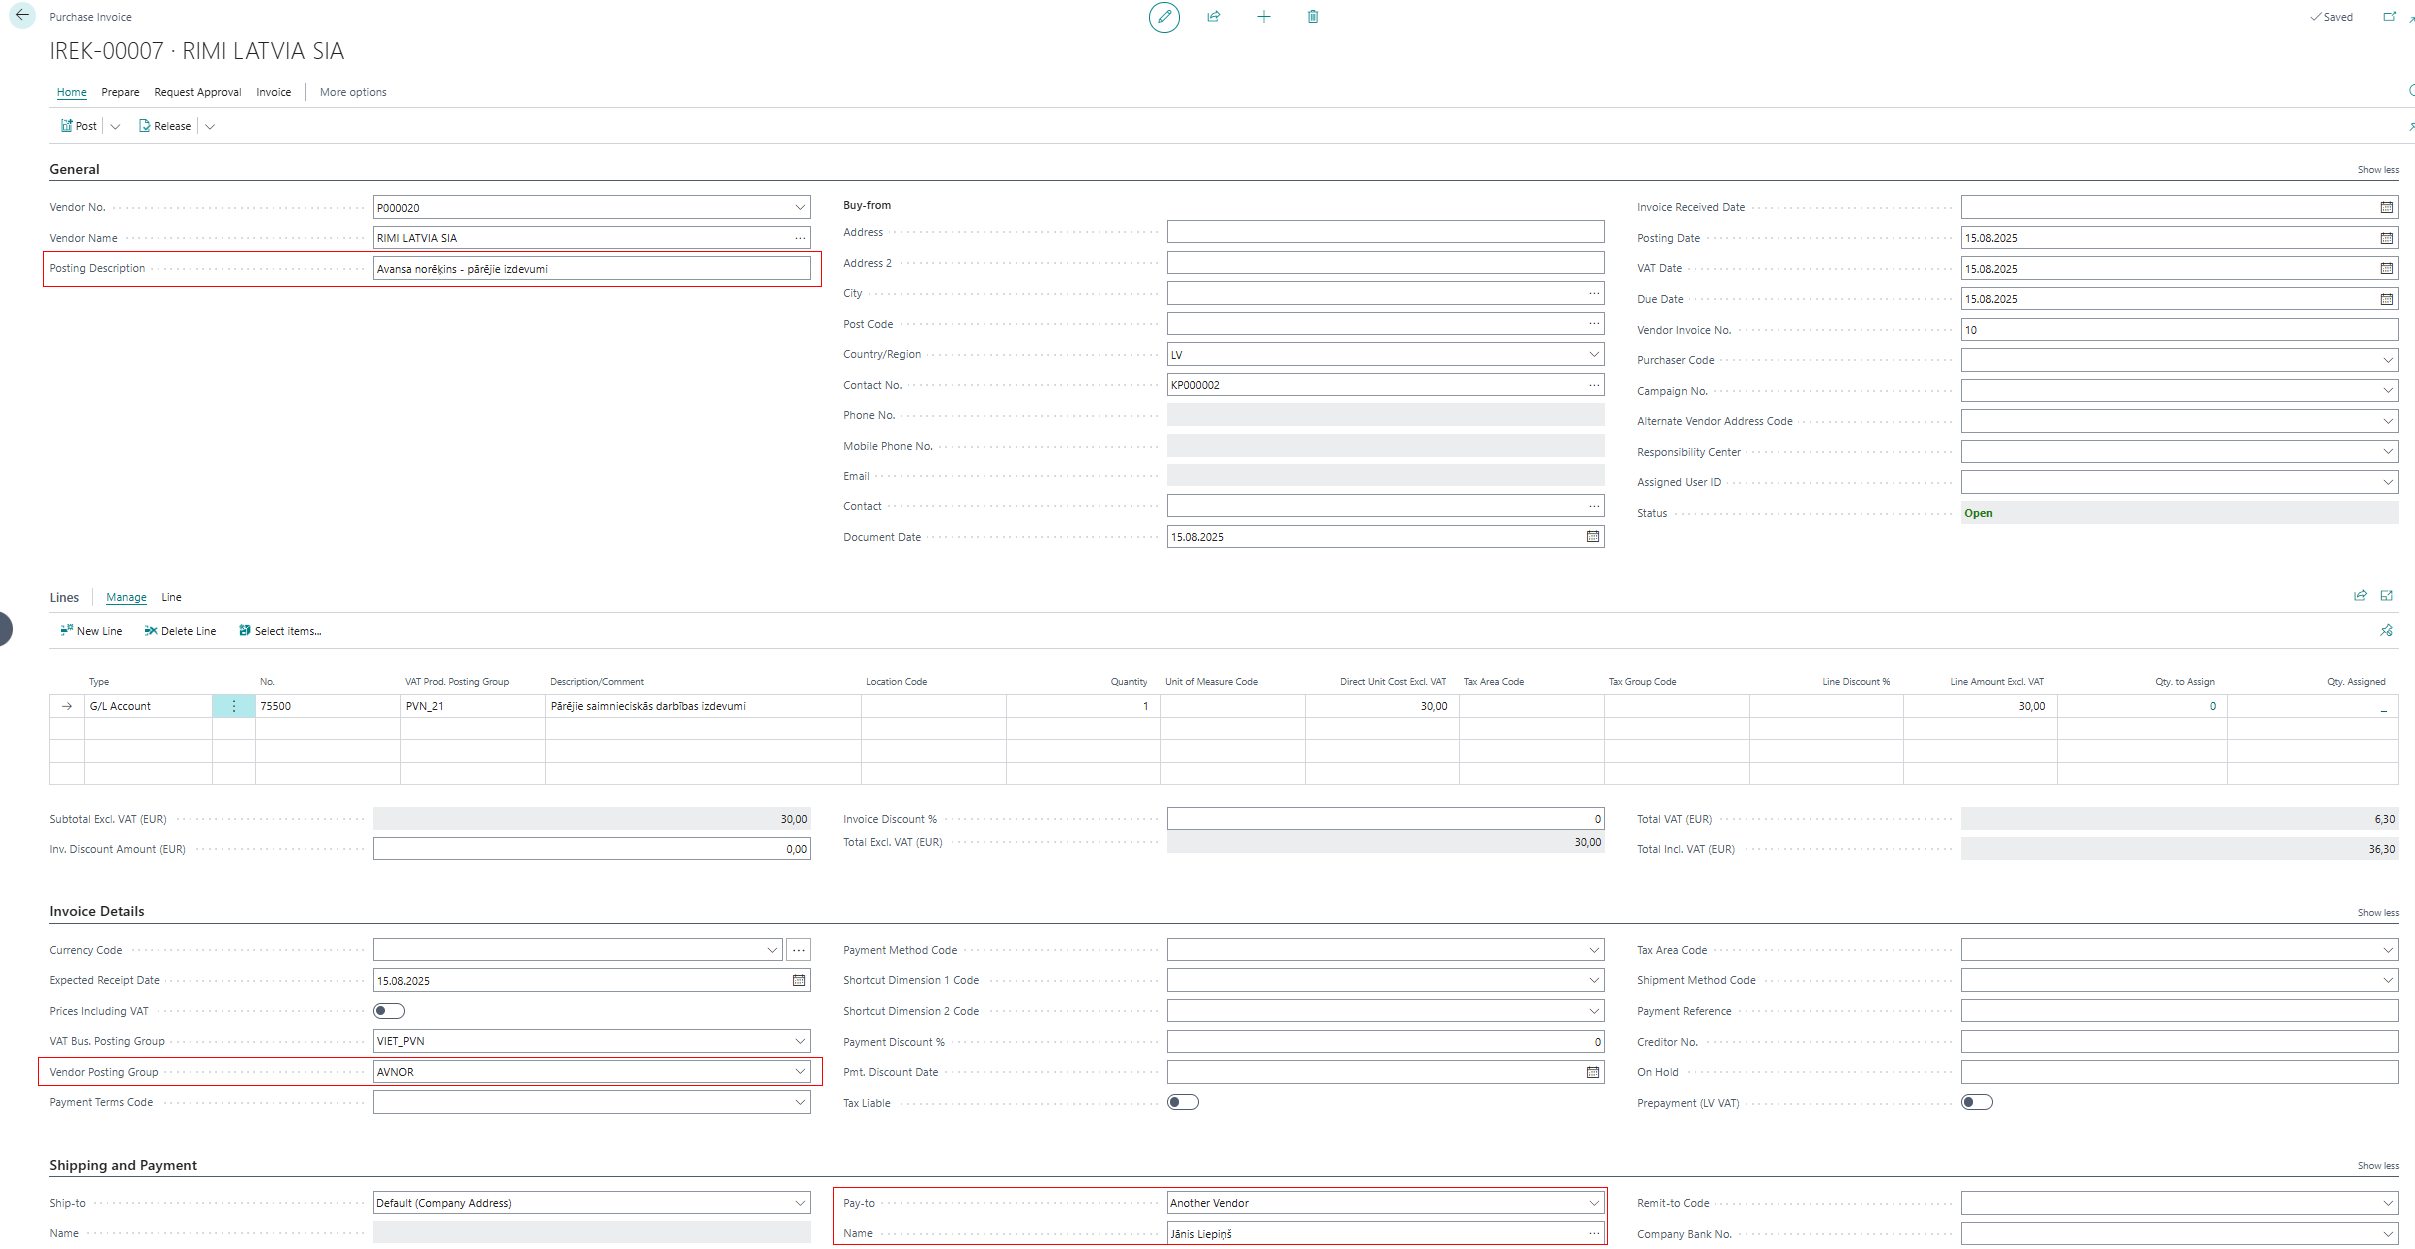
In case all Vendors, from which an advance holder made procurements, are entered in Business Central as Vendors, then per each advance holder transaction a purchase document (purchase invoice, purchase credit memo) is created. Buy-From Vendor is the original Vendor who provided goods or services, whereas Pay-To Vendor is set as Advance Holder. Posting Description field needs to be completed with information describing the deal. If it is necessary to use a different Vendor posting group, then select the appropriate one.
In case Vendors, from which an advance holder made procurements, are NOT entered in Business Central as Vendors, then per each advance holder transaction a purchase journal entry (purchase invoice, purchase credit memo) is created. Description field needs to be completed with information with original vendor data and information describing the deal.

Prepare Advance Statement Report
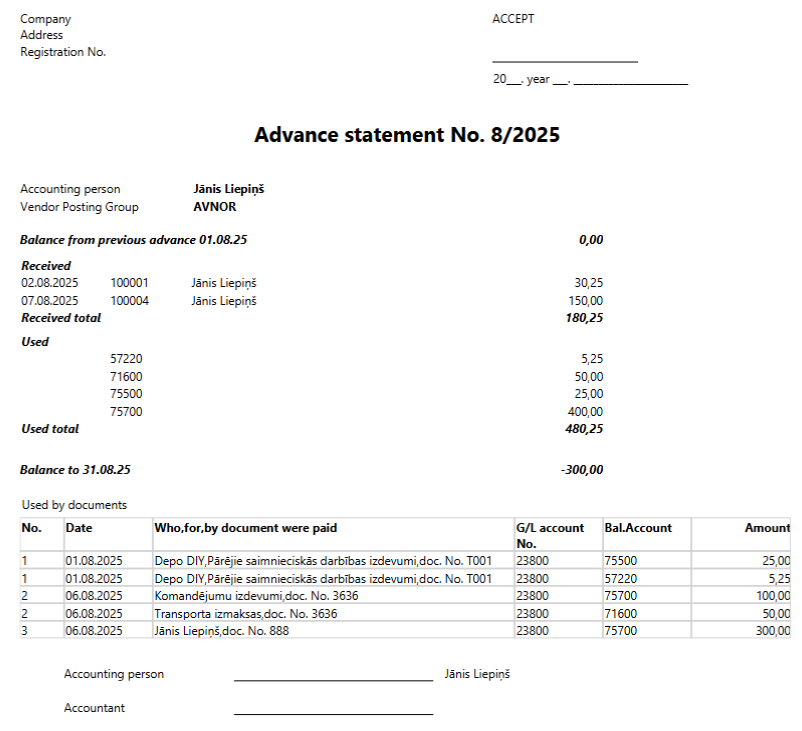
Purpose: The company reimburses the employee for the expense amount and controls a balance for each advance holder.
Availability: can be accessed from Search for Page or Report…
Pre-requisites: Vendor Card with Vendor Posting Group for Advance holders should be created In order to use the functionality, the following steps are required:
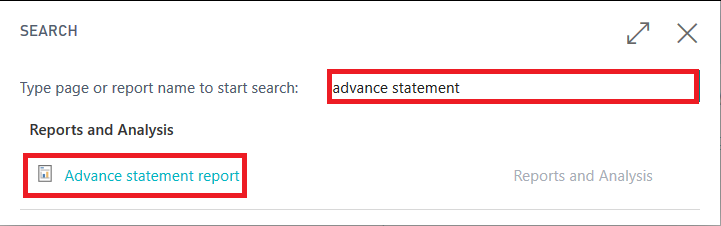
- Click on the button Search for Page or Report...

- Type Advance statement report and select Advance statement report from Reports and Analysis
Printing Options: the following printing options are available for this printout:
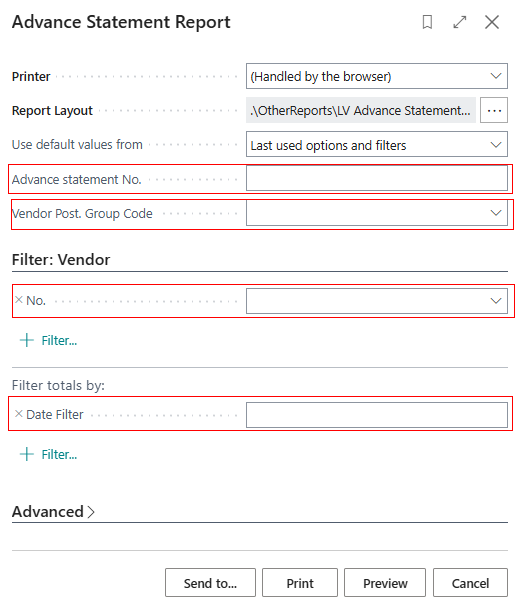
- Advance statement No. – enter advance statement number that will appear on the report printout.
- Vendor No. – select one particular advance holder from the list of vendors.
- Vendor Post. Group Code - Vendor Posting Group should be specified if costs are shared, such as advance payments and business trip costs. If you do not want to share, then leave it blank.
- Date Filter – set date filter for advance statement period.
Customer Balance Reconciliation Statement
Purpose: Company may reconcile balances with its customers on regular basis.
Availability: can be accessed from Search for Page or Report…
Pre-requisites:
- Customer should have at least one transaction;
- In order for the amounts from the G/L Accounts to appear in the report Customer Balance Reconciliation, the fields Source Type and Source No. should be filled in the General Ledger entries.

To show the amounts that are related to the vendor, the vendor and customer cards have to be linked with one Contact card.
- The table Report Selection - Sales should be set up:
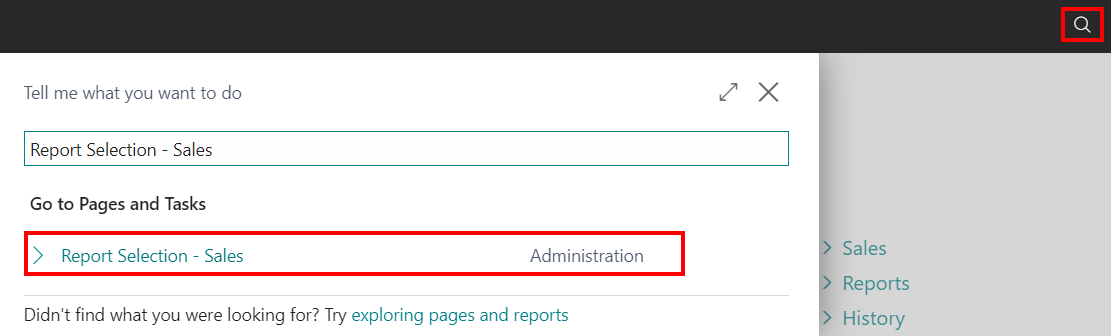
- Click on the Search button and open the page Report Selection - Sales
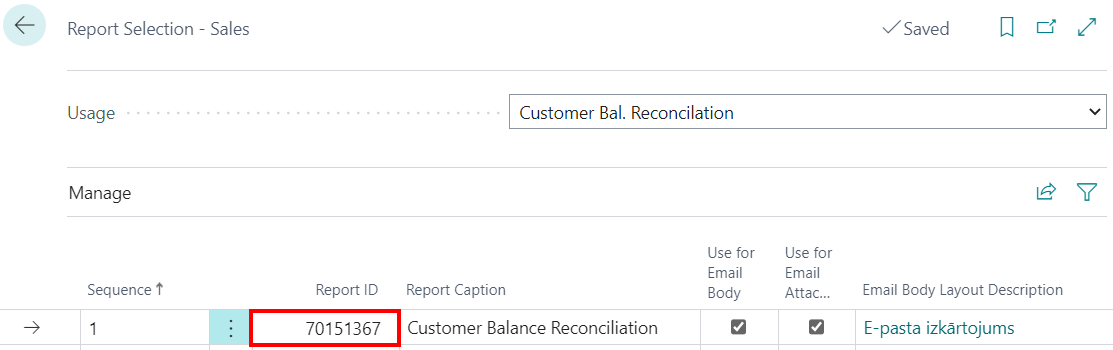
- In the field Usage choose the document type Customer Bal. Reconciliation

- Fill in the lines by choosing the Report ID - 70151367
Restrictions
The amounts from the G/L Accounts are showed only in the local currency.
Printing Options: the following printing options are available for this printout:
- Reconcile Date – set date for balance reconciliation
- Return Date – set date for the document to be returned to the company
- Combine by Registration No. – if checked, then all transactions of one customer with several customer cards is presented in one report, combining them by registration no.
- Include Vendor Debts – can be checked, when customer card and vendor cards are linked with the same contact card, then customer and vendor outstanding balances are presented in one report
- Print Details – if checked, then detailed open transactions are presented in the report
- Print Not Zero Balance – if checked, then report is prepared for all customers with outstanding balance at date
- Print Amounts in Currency – if checked, then detailed open transactions are presented in the original currency of the transaction
- Issued – an employee from the Employee List should be indicated, who issued the reconciliation document Customer Balance Reconciliation can be prepared by applying customer filter.
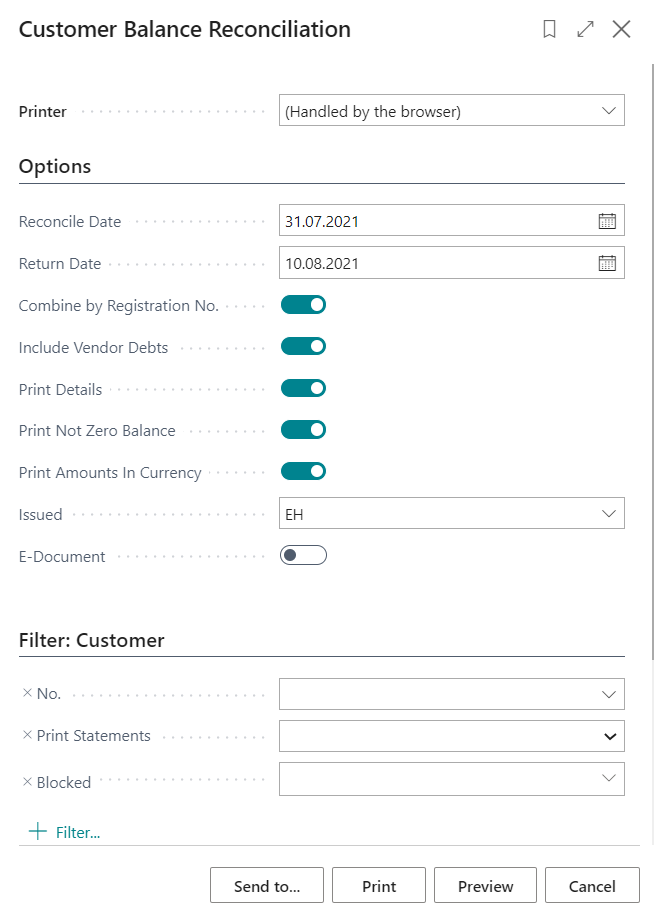
- Electronic document - indicate if the answer is expected to be received electornically and it is not necessary to include the signature lines in the document.
Prepayments
- G/L account filter - indicate the G/L account numbers that you want to show to the customer in the Customer Balance Reconciliation document. The total value of the G/L entries from the indicated G/L accounts (-s) for which the Source Type is Customer, and the Source No. matches with the Customer No. will be displayed (and the Vendor No., if the option Include Vendor Debts is turned on). This field is the main indiciation that the prepayments have to be shown in the document;
- Include VAT - turn on, if you want the VAT amounts related to the G/L Entries to be added to the Customer Balance Reconciliation document;
- Print Prepayment Details - indicate if you want to see a detailed view from the G/L Entries related to the prepayments in the appendix;
- Prepayment Details From Date - if the option Print Prepayment Details is turned on, use this field to indicate from which date you want to see the detailed view. You will see the detailed view of the transactions starting from this date to the date indicated in the field Reconcile Date.
Sending
The reconciliation statement can be sent to the customer's e-mail address.
Setup
Open the customer card of the customer for which you want to send the reconciliation statement
In the customer card, choose Related (1) - Customer (2) - Document Layouts (3)
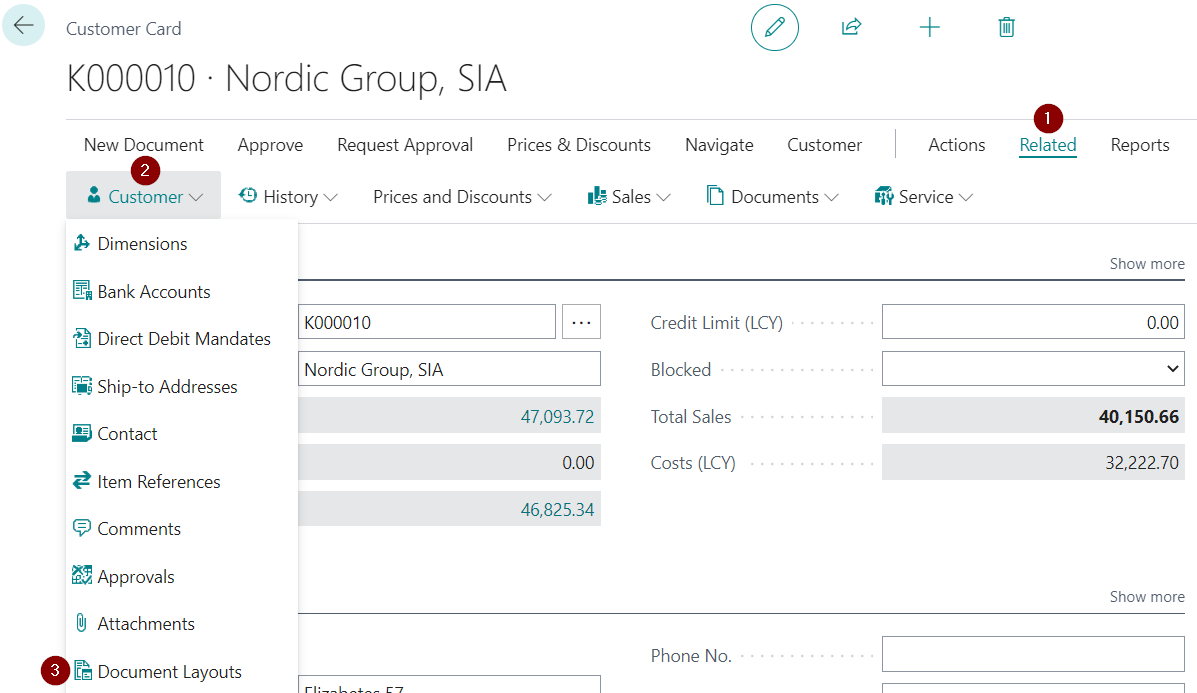
- Fill in the following fields:
- Usage (1) - Customer Bal. Reconciliation
- Report ID (2) - 70151367
- Send to Email (3) - Customer's e-mail
- Email Body Layout Description (4) - choose the appropriate

To adjust the E-mail body layout, click on the Search button and open the page Custom Report Layouts
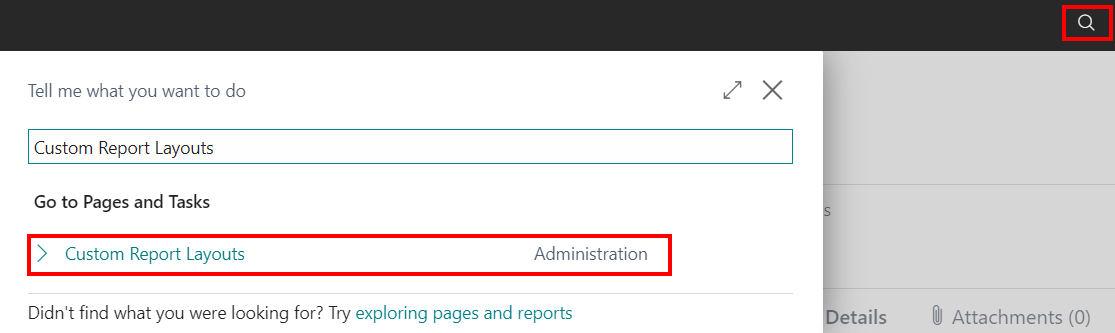
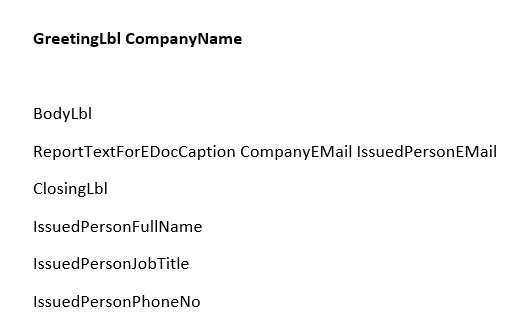
You can create your custom E-mail body in the WORD document format
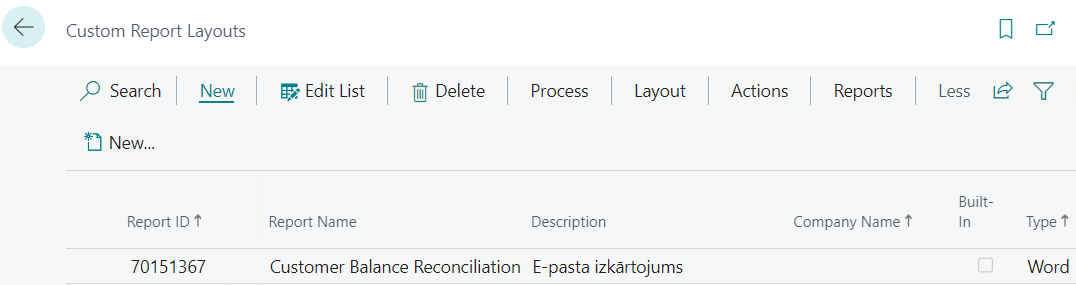
The document layout can be exported - the necessary changes can be done in the WORD document, and imported under Actions (1) - Export Layout (3) and Import Layout (2)

The documents are created by inserting the fields. Example:
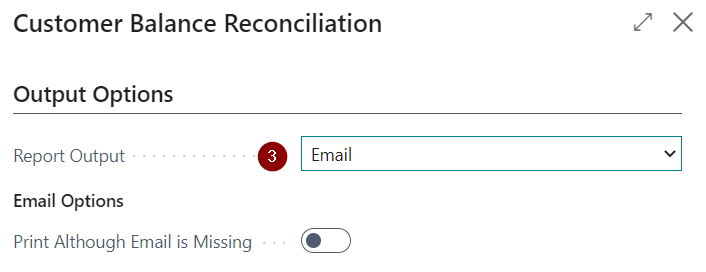
- When creating the reconciliation document from the customer card (Reports (1) - Customer Balance Reconciliation (2)), a field Report Output (3) is available. In order to send the report to the customer through E-mail, choose the document type Email in this field.

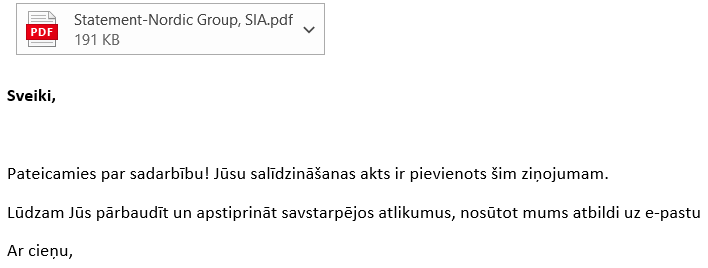
When all the necessary information is filled in, such as Reconcile date and Return date, click on the OK button. The reconciliation document is sent to the customer's e-mail address that was set up previously.
Vendor Balance Reconciliation Statement
Purpose: Company may reconcile balances with its vendors on regular basis.
Availability: can be accessed from Search for Page or Report…
Pre-requisites:
- Vendor should have at least one transaction;
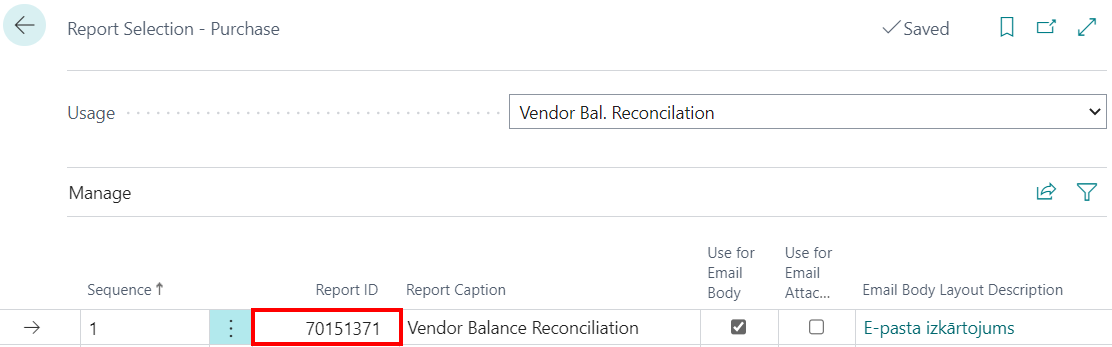
- The table Report Selection - Purchase should be set up:
- Click on the Search button and open the page Report Selection - Purchase
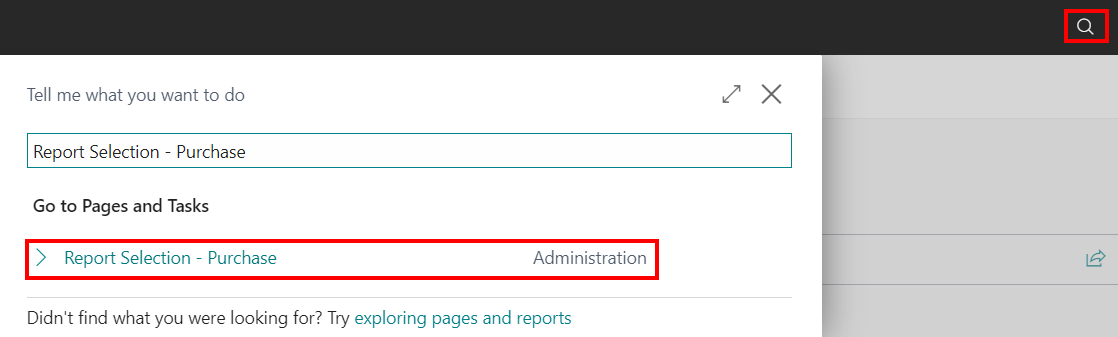
- In the field Usage choose the document type Vendor Bal. Reconciliation

- Fill in the lines by choosing the Report ID - 70151371
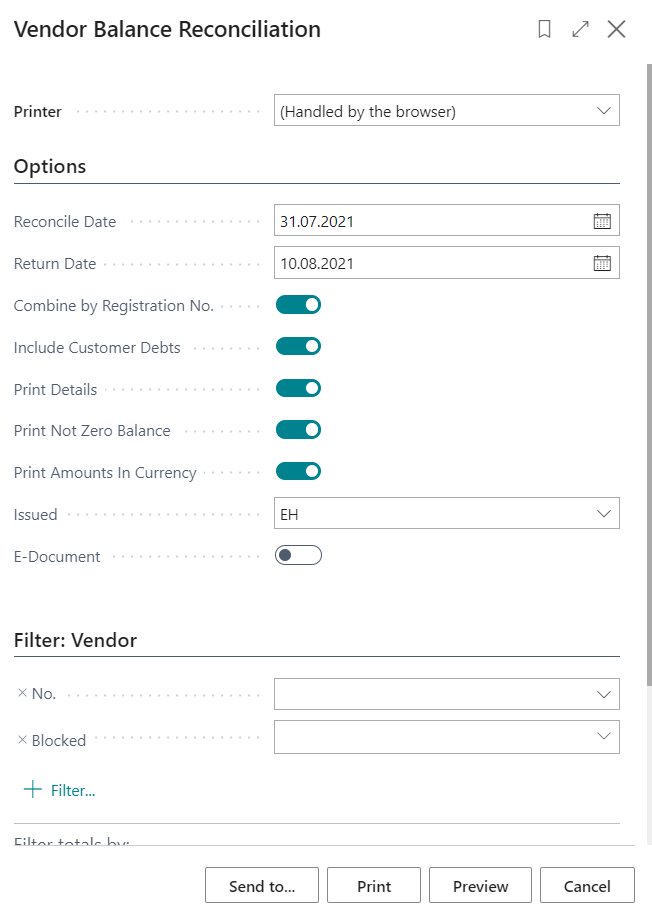
Printing Options: the following printing options are available for this printout:
- Reconcile Date – set date for balance reconciliation
- Return Date – set date for the document to be returned to the company
- Combine by Registration No. – if checked, then all transactions of one vendor with several vendor cards is presented in one report, combining them by registration no.
- Include Customer Debts – can be checked, when customer card and vendor cards are linked with the same contact card, then customer and vendor outstanding balances are presented in one report
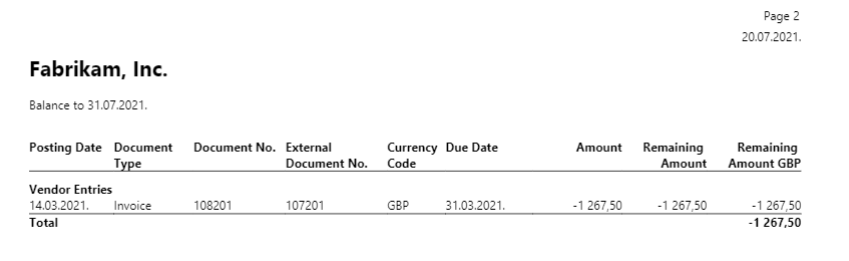
- Print Details – if checked, then detailed open transactions are presented in the report
- Print Not Zero Balance – if checked, then report is prepared for all vendors with outstanding balance at date
- Print Amounts in Currency – if checked, then detailed open transactions are presented in the original currency of the transaction
- Issued – an employee should be indicated, who issued the reconciliation document
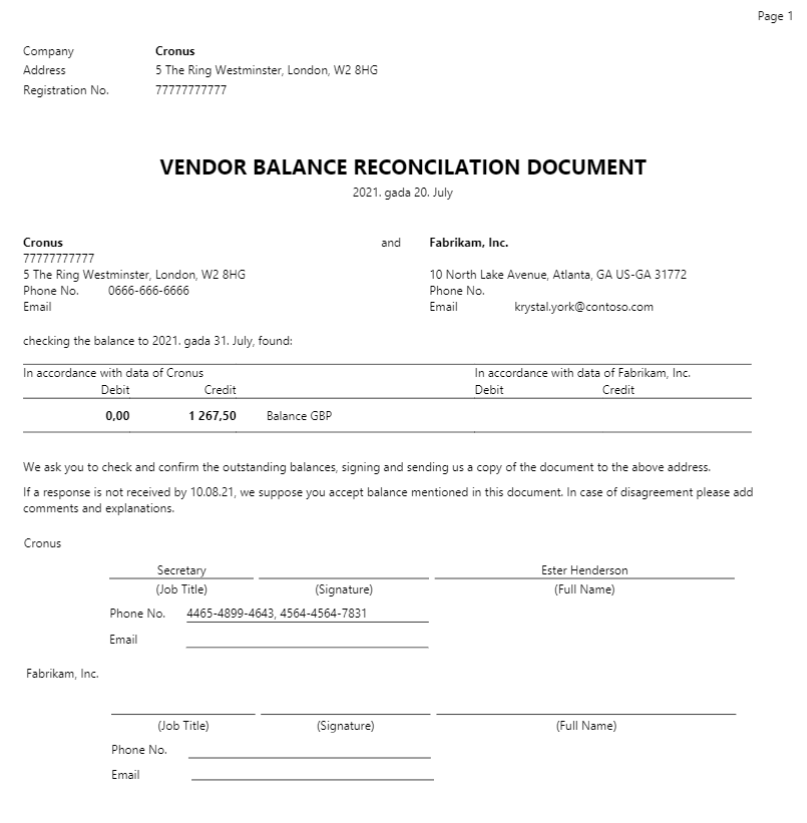
- Vendor Balance Reconciliation can be prepared by applying vendor filter.
Sending
The reconciliation statement can be sent to the vendor's e-mail address.
Setup
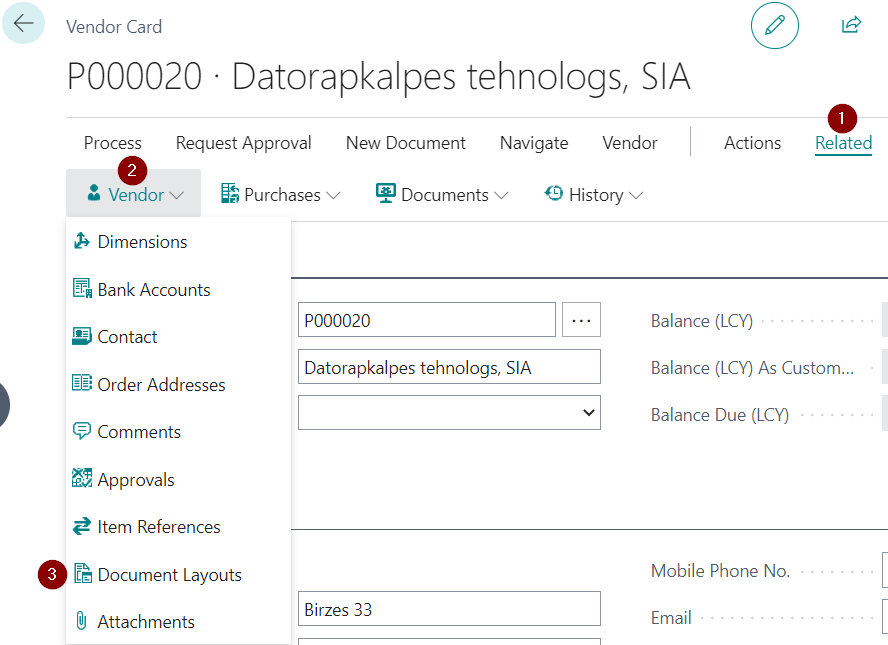
Open the vendor card of the vendor for which you want to send the reconciliation statement
In the vendor card, choose Related (1) - Vendor (2) - Document Layouts (3)
- Fill in the following fields:
- Usage (1) - Vendor Bal. Reconciliation
- Report ID (2) - 70151371
- Send to Email (3) - Customer's e-mail
- Email Body Layout Description (4) - choose the appropriate

To adjust the E-mail body layout, click on the Search button and open the page Custom Report Layouts
You can create your custom E-mail body in the WORD document format
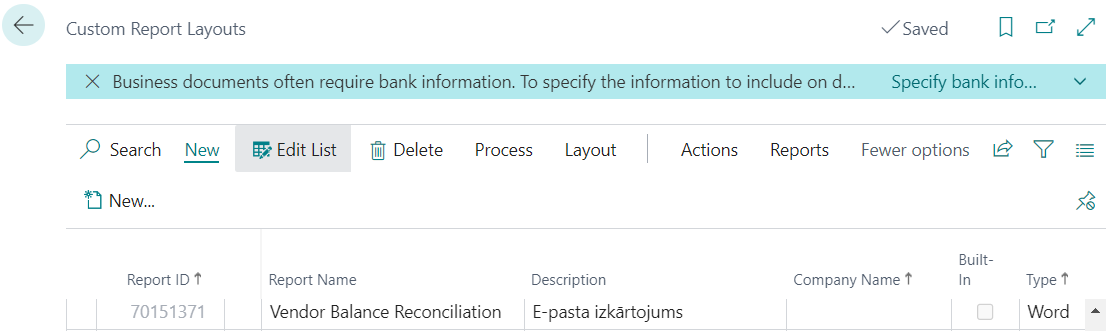
The document layout can be exported - the necessary changes can be done in the WORD document, and imported under Actions (1) - Export Layout (3) and Import Layout (2)
The documents are created by inserting the fields. Example:
- When creating the reconciliation document from the vendor card (Reports (1) - Vendor Balance Reconciliation (2)), a field Report Output (3) is available. In order to send the report to the vendor through E-mail, choose the document type Email in this field.

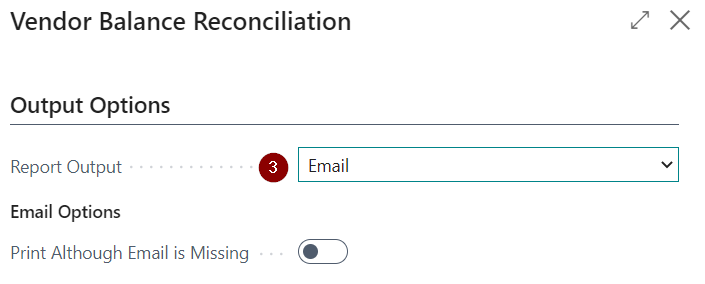
When all the necessary information is filled in, such as Reconcile date and Return date, click on the OK button. The reconciliation document is sent to the vendor's e-mail address that was set up previously.
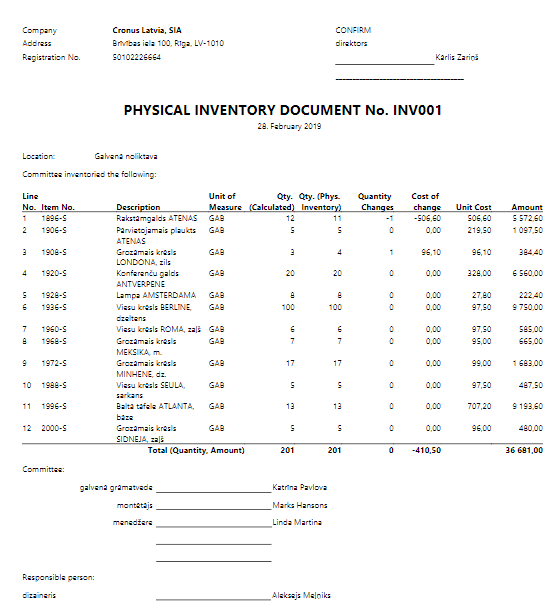
Phys. Inventory Document
Purpose: Company may perform a stock-take on regular basis.
Availability: can be accessed from Search for Page or Report…
Pre-requisites: document can be printed only after the Phys. Inventory Journal lines are posted and Adjust Cost-Item Entries job has been successfully executed.
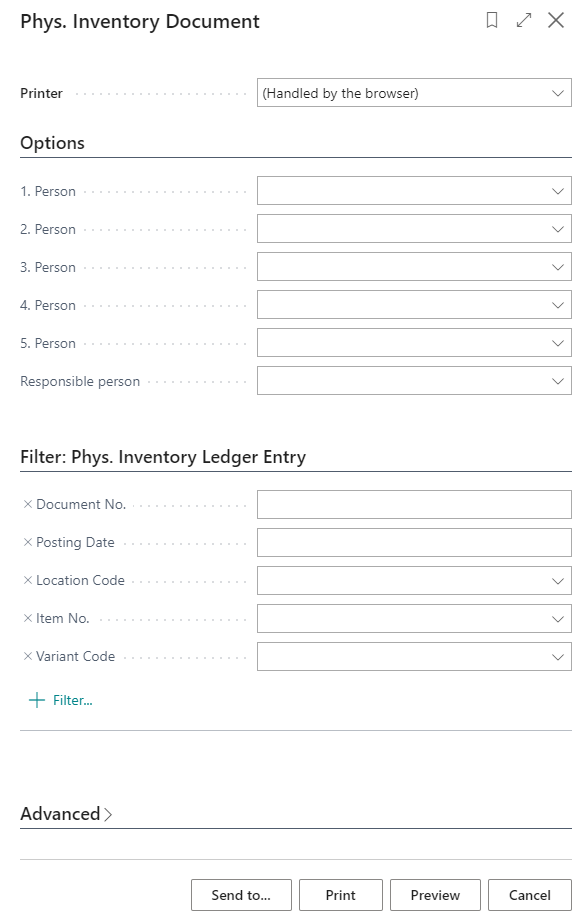
Printing Options: the following printing options are available for this printout:
- 1.Person.. 5.Person – select employees from List of Employees to indicate the commission who participates in stock-take
- Responsible Person- select employee who is financially responsible for keeping the stock accurate
- Apply Phys. Inventory Ledger Entry Filters to obtain results of particular stock-take
Inventory Write-off Document
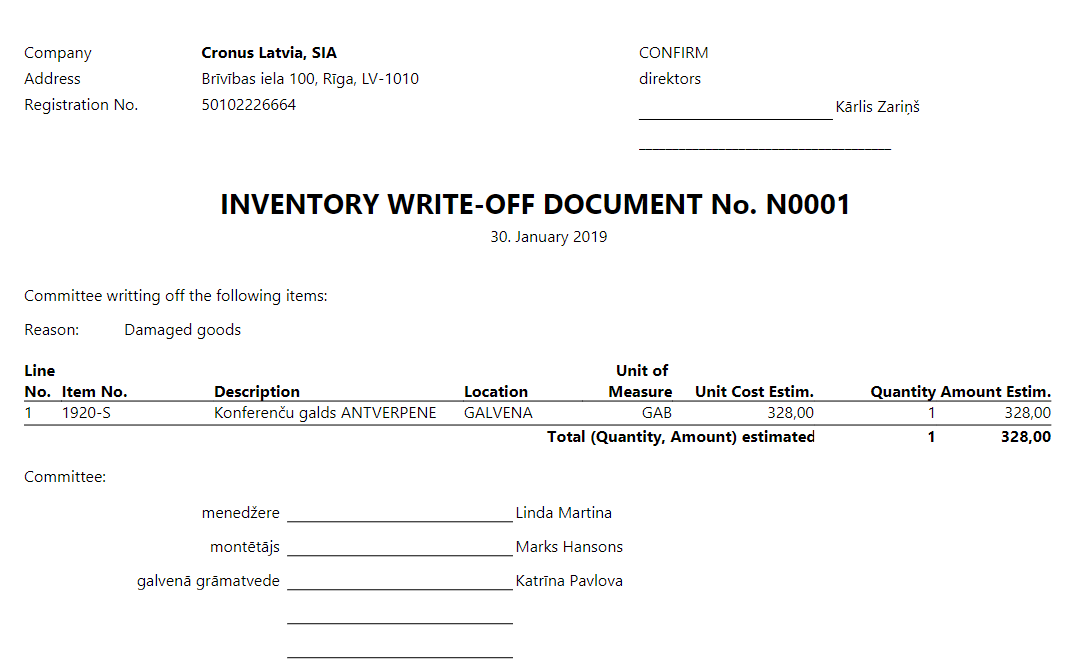
Purpose: Inventory Write-off document is used for writing-off goods that shall not be sold and recognized as expenses.
Available for printing from: Item Journal.
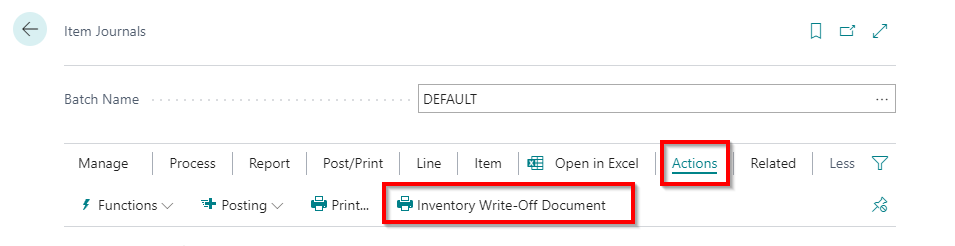
Pre-requisites: Item journal lines with type Negative Adjustment are available in the journal not posted.
Note: When printing the document from unposted item journal lines, the unit cost may not be actual; therefore it is advised to print Posted Inventory Write-off document, using additional filters on item ledger entry in printing options for Item Ledger Entry
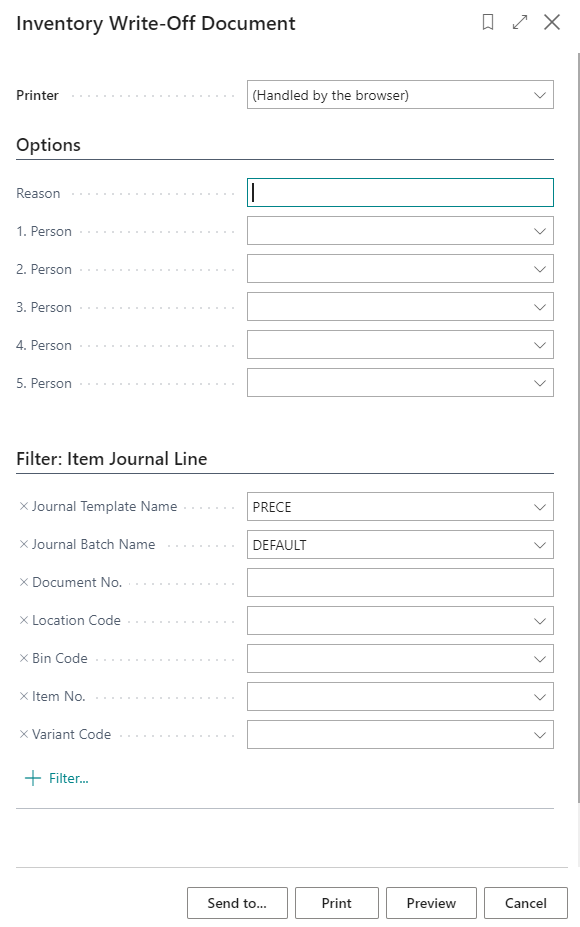
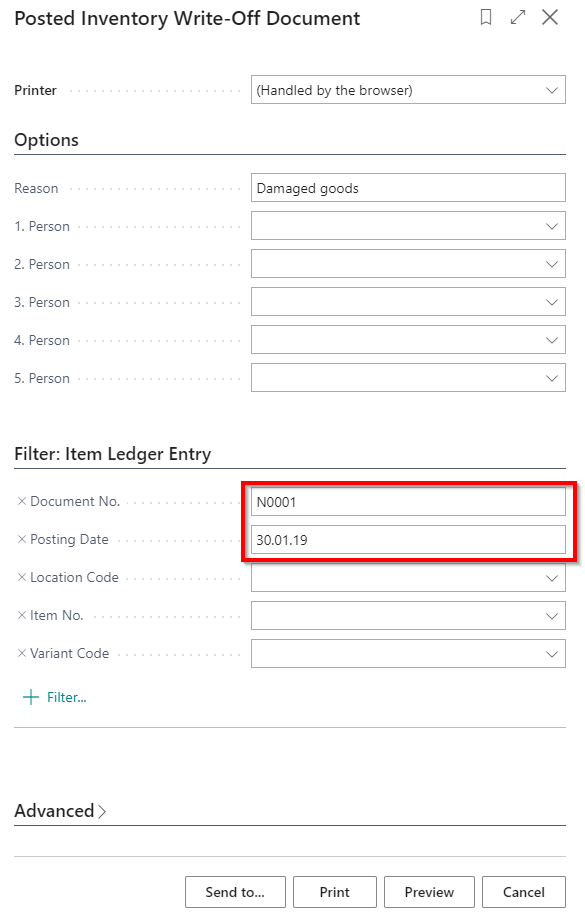
Printing Options: the following printing options are available for this printout:
- Reason – identify the reason for writing items off
- 1.Person.. 5.Person – select employees from List of Employees to indicate the commission who confirms write-off
Posted Inventory Write-off Document
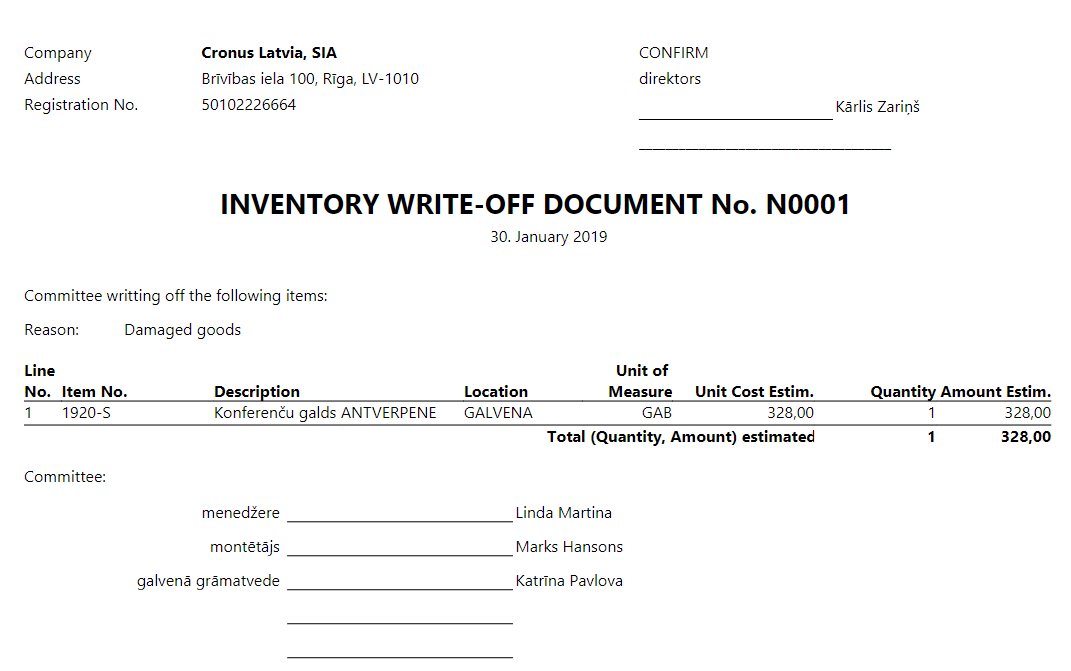
Purpose: Inventory Write-off document is used for writing-off goods that shall not be sold and recognized as expenses.
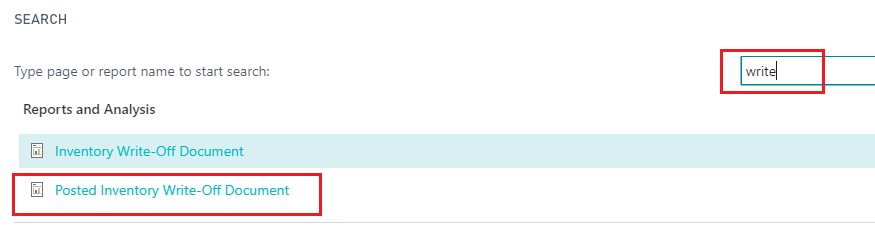
Available for printing from: can be accessed from Search for Page or Report…
Pre-requisites: Item journal lines with type Negative Adjustment are already posted.
Note: When printing the document from unposted item journal lines, the unit cost may not be actual; therefore it is advised to print Posted Inventory Write-off document, using additional filters on item ledger entry in printing options for Item Ledger Entry
Printing Options: the following printing options are available for this printout:
- Reason – identify the reason for writing items off
- 1.Person.. 5.Person – select employees from List of Employees to indicate the commission who confirms write-off
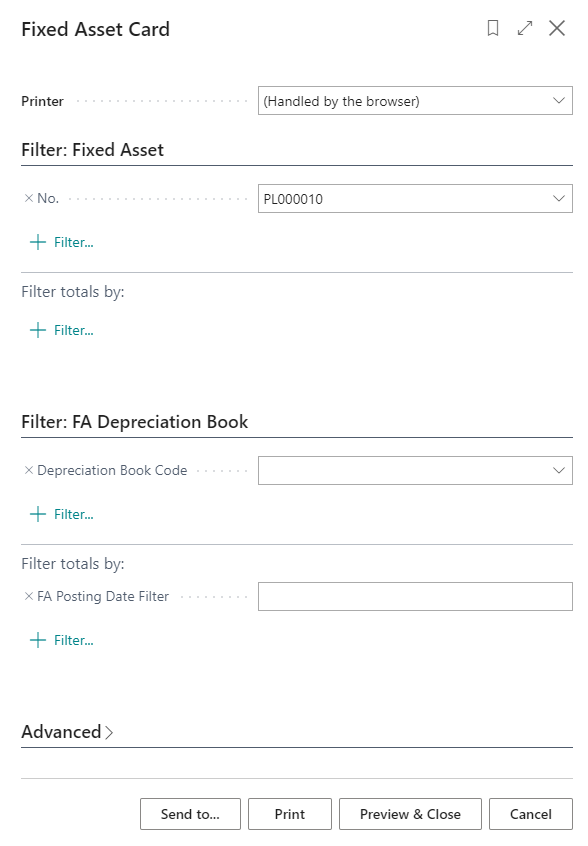
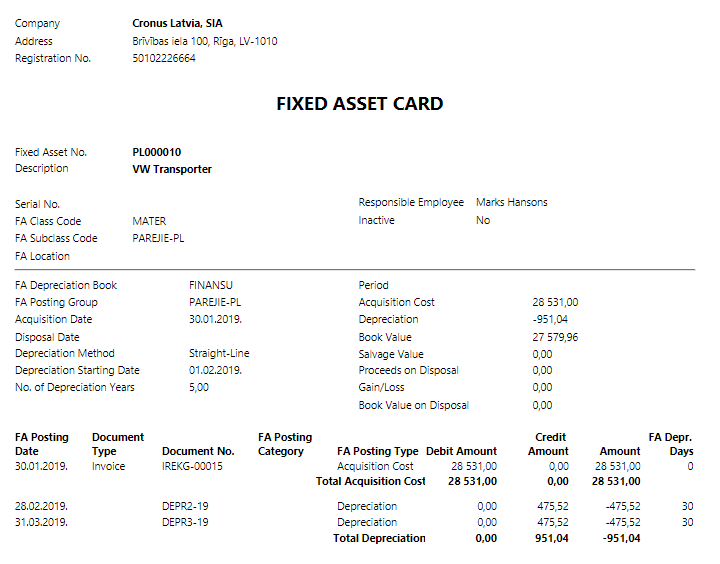
Fixed Asset Card
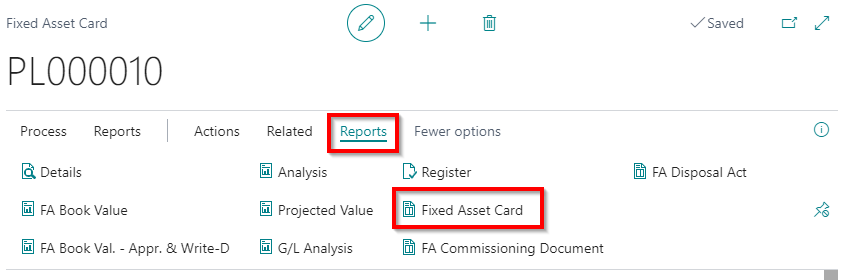
Purpose: Fixed asset card may be printed that is compliant with local legislation Available for printing from: fixed asset card. Particular Print button Fixed Asset Card is located in the Ribbon under the TAB REPORT, in section General
Pre-requisites: fixed asset card must exist.
Printing Options: the following printing options are available for this printout:
- No. – determine fixed asset number for which the document is printed
Fixed Asset Commissioning Document
Purpose: Acquisition of a fixed asset is followed by fixed delivery and acceptance document, confirming the launch of a fixed asset in exploitation.
Available for printing from: fixed asset card.
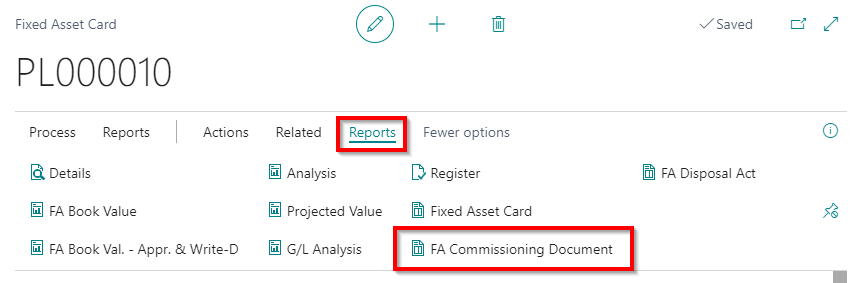
Pre-requisites: fixed asset is created in the system, all required information is completed. Acquisition process has been completed in Business Central.
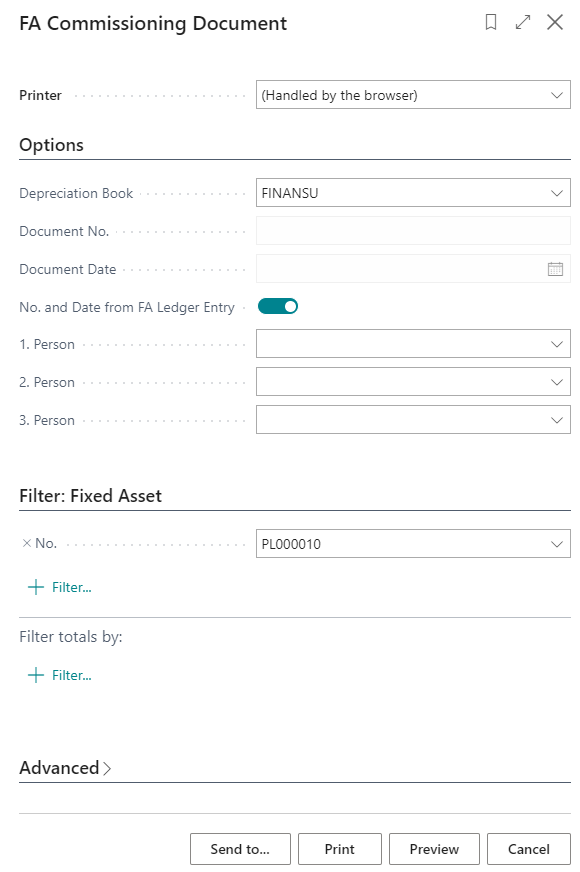
Printing Options: the following printing options are available for this printout:
- Depreciation Book- choose depreciation book used, in order to represent the fixed asset value
- Either use:
Document No.- indicate the number of the document for fixed asset count
Document Date- set document date for fixed asset count OR
No. and Date from FA Ledger Entry – if checked, then Document No. and Document Date need not to be set
- 1.Person.. 3.Person – select employees from List of Employees to indicate the commission who confirms existence of fixed assets
- Filters for Fixed assets may be applied
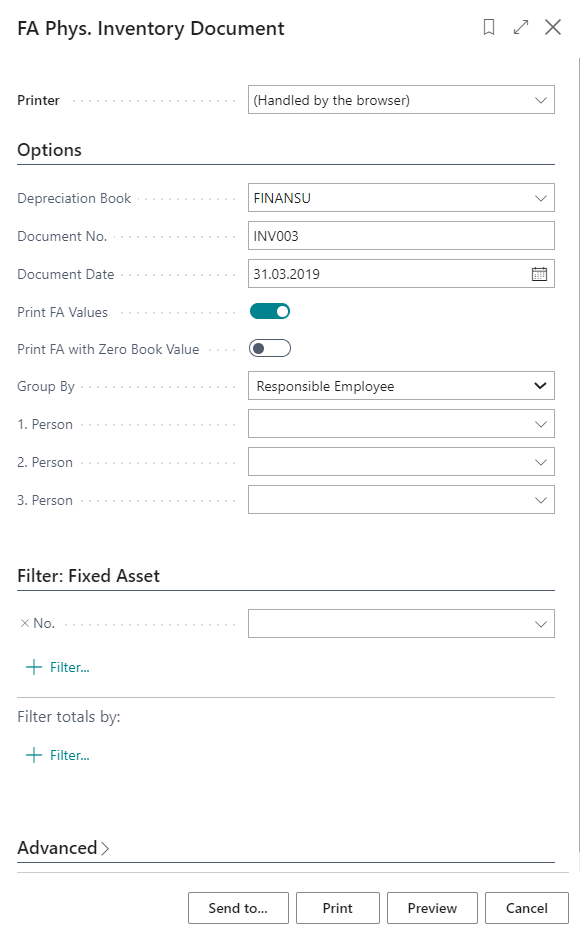
Fixed Asset Phys. Inventory Document
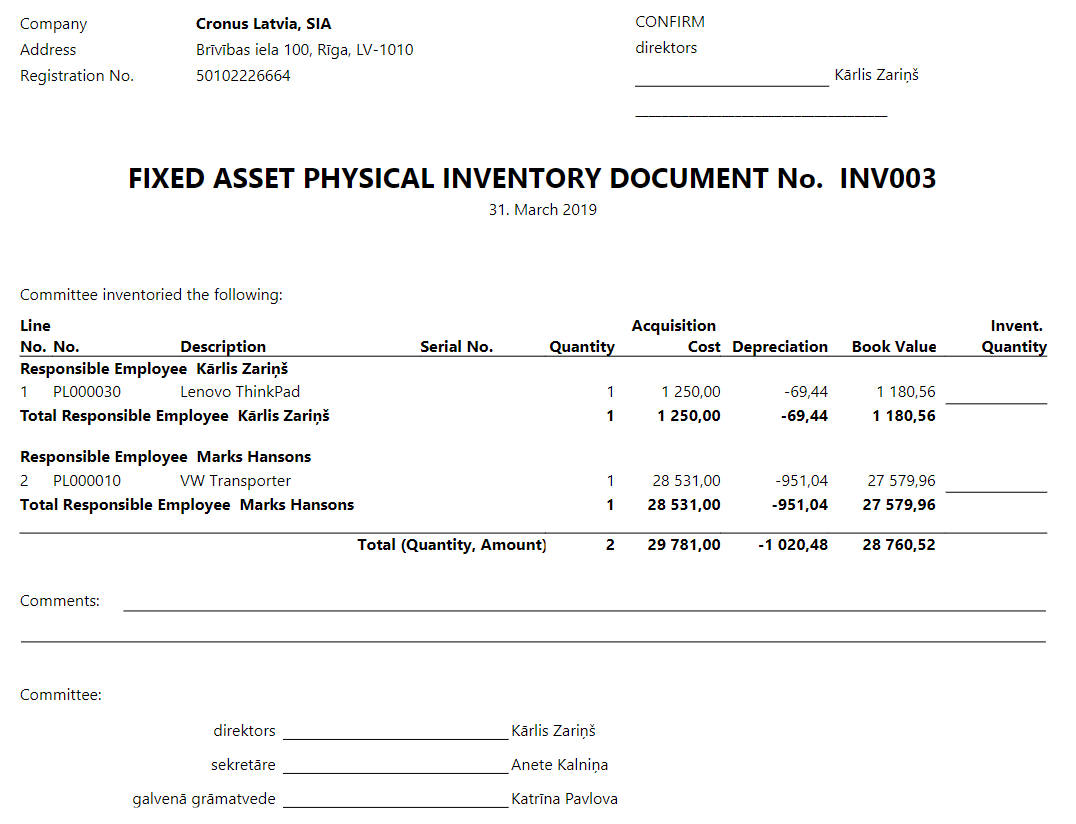
Purpose: Company may prepare fixed asset count, in order to control physical existence of fixed assets on regular basis.
Available for printing from: can be accessed from Search for Page or Report…
Pre-requisites: fixed asset is created in the system, all required information is completed.
Printing Options: the following printing options are available for this printout:
- Depreciation Book- choose depreciation book used, in order to represent the fixed asset value
- Document No.- indicate the number of the document for fixed asset count
- Document Date- set document date for fixed asset count
- Print FA Values- if checked, then fixed asset values (acquisition cost, accumulated depreciation, book value) are printed, taking into account Depreciation book set above
- Print FA with Zero Book Value- .
- Group By – set grouping criteria from none, FA location, Responsible Employee, FA Posting Group
- 1.Person.. 3.Person – select employees from List of Employees to indicate the commission who confirms existence of fixed assets
- Filters for Fixed assets may be applied
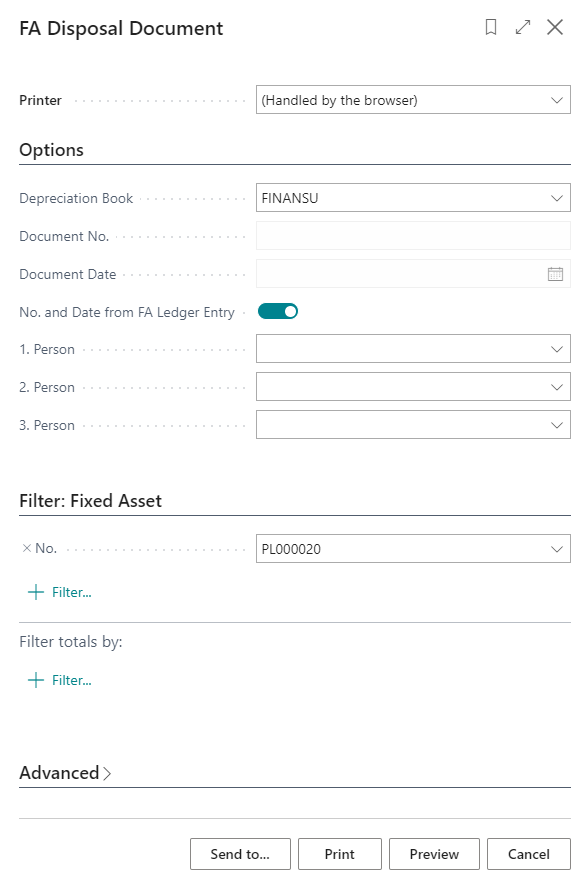
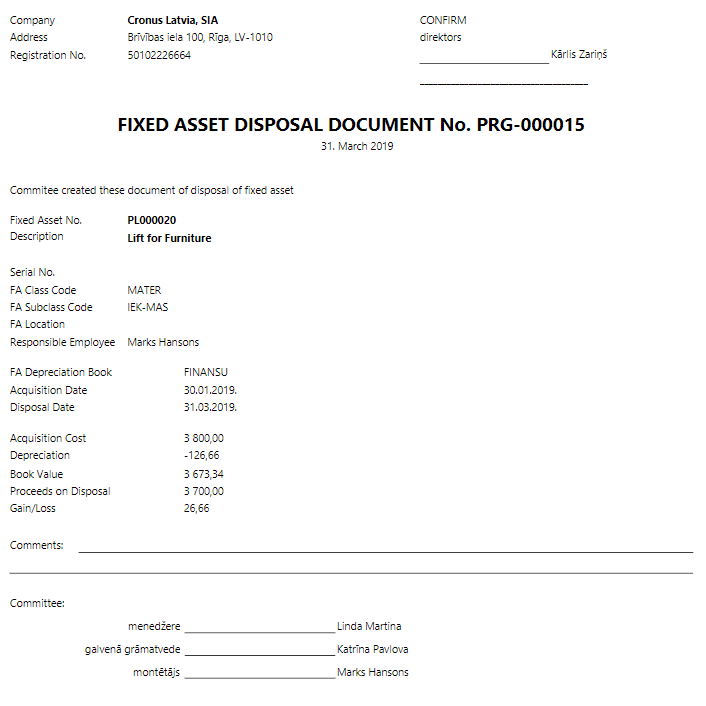
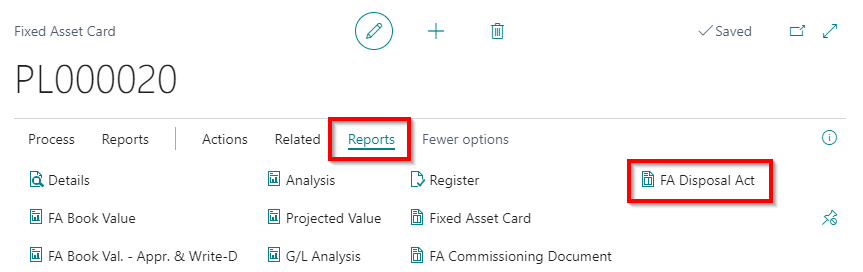
Fixed Asset Disposal Document
Purpose: Disposal of a fixed asset is supported by fixed asset disposal document. Additional comments may be placed, when document is sent to Ms Word.
Available for printing from: fixed asset card.
Pre-requisites: fixed asset is created in the system, all required information is completed. Disposal process has been completed in Business Central, book value is set to zero.
Printing Options: the following printing options are available for this printout:
- Depreciation Book- choose depreciation book used, in order to represent the fixed asset value
- Either use:
o Document No.- indicate the number of the document for fixed asset count
o Document Date- set document date for fixed asset count
or
o No. and Date from FA Ledger Entry – if checked, then Document No. and Document Date need not to be set
- 1.Person.. 3.Person – select employees from List of Employees to indicate the commission who confirms existence of fixed assets
- Filters for Fixed assets may be applied